 GitHub for technical writers
Many organizations rely on GitHub or other repository systems to manage projects. Here are 3 tips to manage documentation in GitHub.
GitHub is a source code repository system that allows anyone to work on a project together. With GitHub, different contributors can collaborate online in an asynchronous mode. Changes to files are tracked automatically, as are contributions, issues, and releases.
While most people assume GitHub is for developers, the reality is that you can track anything using GitHub. You can also use GitHub to manage project documentation, especially those stored in plain text formats such as Markdown or HTML. Here are a few tips you can use to manage your projects's documentation in GitHub.
Create new folder with the "Add file" button
To add a new file to a GitHub project, you probably know to use the "Add file" button. This brings up a small menu to let you create a new file or upload a file from your computer.

By default, the "Create a new file" action makes a new file in the current folder. Type a new filename in the box, and GitHub lets you edit the new file in place.
If you want to create a new file in a new folder within the project, type the new folder's name and add a slash before entering the name of the file. For example, let's say you want to add documentation to a new project called "demo." Instead of adding the new files in the "demo" project folder, you can create a Readme.md Markdown file in a new Docs folder by typing the full path in the “filename” field:
Docs/Readme.mdWhen you type the slash character, GitHub will automatically add Docs to the path to your new file:

Add descriptions to help manage changes
When you create a new file or modify an existing one, GitHub suggests a short description of the change, and lets you add optional extended text to describe the change in more detail.
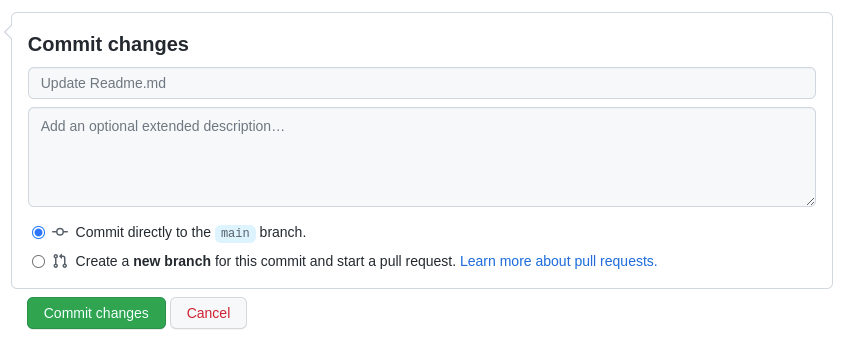
Don't ignore this field; the extended description lets you record what changes you made to the file. Make a note that provides enough context and detail to describe the change.
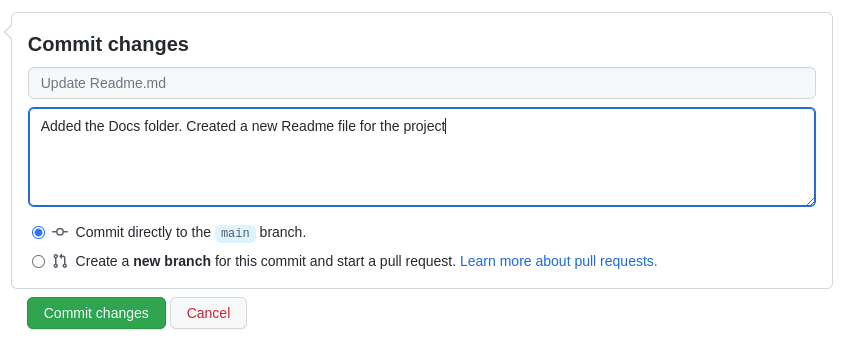
Also consider updating the short description to document your edits. The short description will be visible in the file list view, so keep it brief but descriptive.

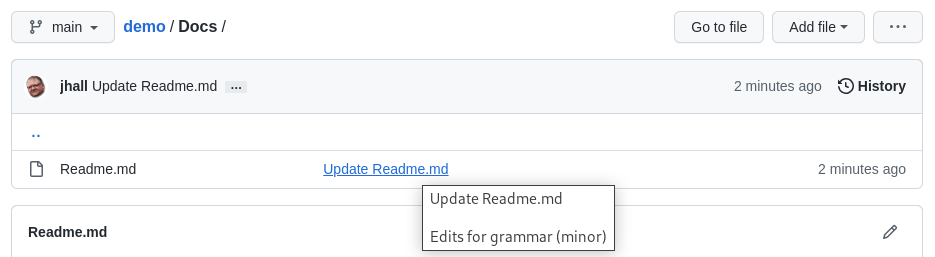
Click the change description to see the changes
When browsing the file list in a folder, GitHub will display the latest short change description next to each file. While it may not look like it, that short description is actually a link. Hover over the link and it will turn blue and display the full change description in an info box:
Click on the short description to see the changes made in that version. GitHub shows the edits as source code by default. The standard view unifies the changes so edits are shown in the same file; to compare changes side-by-side, click the "Split" button. Regardless of view mode, changes are highlighted for you: red for the old version, green for the new version.

Unfortunately, you cannot revert changes using the GitHub website. If you need to roll back changes on files managed in GitHub, you will need to use a GitHub command line tool or the GitHub Desktop app.
GitHub is a powerful tool to manage projects, including documentation. Like other source code trackers, GitHub lets you manage changes and view history. While GitHub is often popular with developers, you can also use GitHub to manage project documentation. Use these tips to get started managing your next project in GitHub.

Jim Hall is an open source software advocate and technical writer. At work, Jim is CEO of Hallmentum, an IT executive consulting company that provides hands-on IT Leadership training, workshops, and coaching.