 Putting it all together with DITA Maps
Connect multiple DITA topics together using DITA Map to create different kinds of documents - all without copy/paste.
If you write documentation that requires copying and pasting content from different sources, you might be a good candidate for using DITA. DITA (the Darwin Information Typing Architecture) is an XML-based markup system that allows you to separate content into individual files as "topics." When working with DITA, every topic is a separate unit of information, such as DITA Concepts to store information about a thing or process, DITA Tasks to track the steps to complete a task, and a DITA Reference that contains just the facts about something.
Once your content is separated into these topic files, you can glue them together in any order to generate a variety of different outputs. The mechanism that connects these topics and arranges them in the right order is the DITA Map.
A sample project
Let's start with a sample project that is a good example of using DITA. A software product might come in different versions or flavors, where each flavor is basically the same as the other versions, but packaged in a different way. In this sample, we'll use three versions: the Default version, the Student edition, and the Power User edition.
<?xml version="1.0" encoding="UTF-8"?>
<!DOCTYPE concept PUBLIC "-//OASIS//DTD DITA Concept//EN" "concept.dtd">
<concept id="Untitled">
<title>Default Version</title>
<shortdesc>The Default Version of the software.</shortdesc>
<conbody>
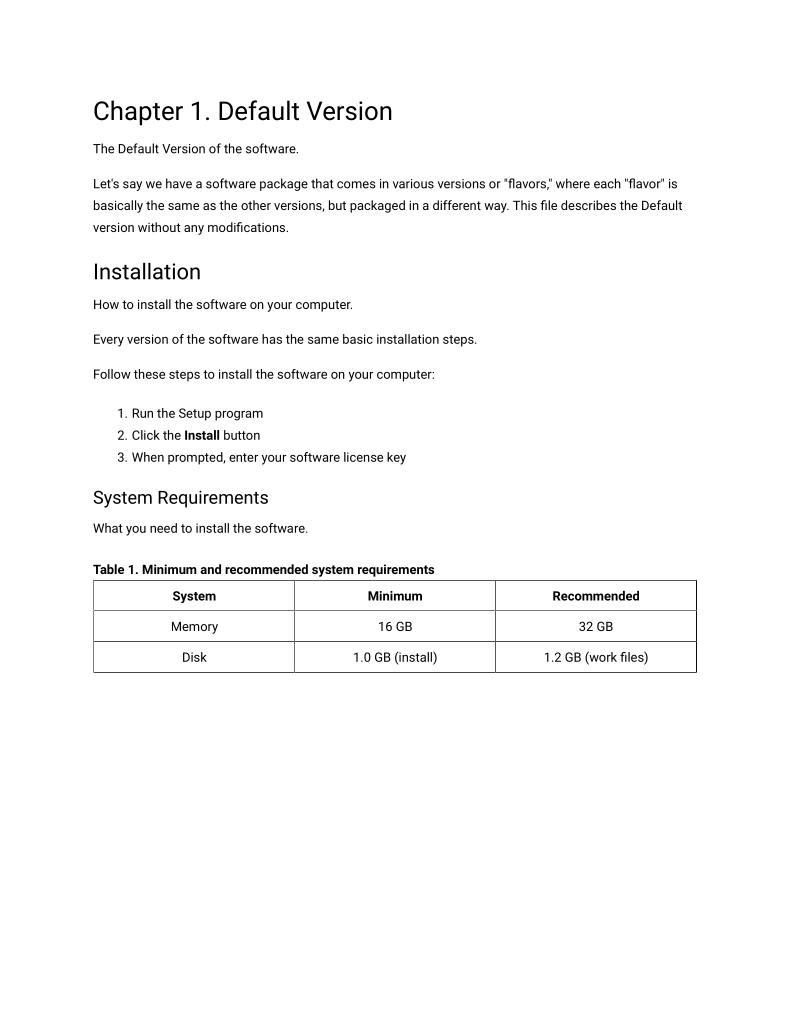
<p>Let's say we have a software package that comes in various versions or "flavors," where
each "flavor" is basically the same as the other versions, but packaged in a different
way. This file describes the <keyword>Default</keyword> version without any
modifications.</p>
</conbody>
</concept><?xml version="1.0" encoding="UTF-8"?>
<!DOCTYPE concept PUBLIC "-//OASIS//DTD DITA Concept//EN" "concept.dtd">
<concept id="student">
<title>Student Edition</title>
<shortdesc>The Student Edition of the software.</shortdesc>
<conbody>
<p>This Concept file describes the Student Edition version of the application, available
only to students. This is less expensive, but doesn't include a few big features. </p>
</conbody>
</concept><?xml version="1.0" encoding="UTF-8"?>
<!DOCTYPE concept PUBLIC "-//OASIS//DTD DITA Concept//EN" "concept.dtd">
<concept id="power">
<title>Power User</title>
<shortdesc>The Power User version of the software.</shortdesc>
<conbody>
<p>This Concept file describes the Power User version of the application. It is more
expensive but includes a bunch of extra tools.</p>
</conbody>
</concept>Because each version is essentially the same, they all share the same installation steps and system requirements.
<?xml version="1.0" encoding="UTF-8"?>
    <!DOCTYPE task PUBLIC "-//OASIS//DTD DITA Task//EN" "task.dtd">
    <task id="install">
        <title>Installation</title>
        <shortdesc>How to install the software on your computer.</shortdesc>
        <taskbody>
            <context>Every version of the software has the same basic installation steps.<p>Follow these
                    steps to install the software on your computer:</p></context>
            <steps>
                <step>
                    <cmd>Run the Setup program</cmd>
                </step>
                <step>
                    <cmd>Click the <uicontrol>Install</uicontrol> button</cmd>
                </step>
                <step>
                    <cmd>When prompted, enter your software license key</cmd>
                </step>
            </steps>
        </taskbody>
</task><?xml version="1.0" encoding="UTF-8"?>
<!DOCTYPE reference PUBLIC "-//OASIS//DTD DITA Reference//EN" "reference.dtd">
<reference id="systemreq">
<title>System Requirements</title>
<shortdesc>What you need to install the software.</shortdesc>
<refbody>
<table frame="all" rowsep="1" colsep="1" id="table_bqh_fmb_4yb">
<title>Minimum and recommended system requirements</title>
<tgroup cols="3" align="center">
<colspec colname="c1" colnum="1" colwidth="1*"/>
<colspec colname="c2" colnum="2" colwidth="1*"/>
<colspec colname="c3" colnum="3" colwidth="1*"/>
<thead>
<row>
<entry>System</entry>
<entry>Minimum</entry>
<entry>Recommended</entry>
</row>
</thead>
<tbody>
<row>
<entry>Memory</entry>
<entry>16 GB</entry>
<entry>32 GB</entry>
</row>
<row>
<entry>Disk</entry>
<entry>1.0 GB (install)</entry>
<entry>1.2 GB (work files)</entry>
</row>
</tbody>
</tgroup>
</table>
</refbody>
</reference>If you were to write a master document that describes every flavor of the software, such as to share with your service desk as a reference guide, you would need to include the installation steps and system requirements for every version. Writing this master document using a traditional word processor requires copying and pasting content between sections.
But consider this scenario: After you copy and paste the installation steps between each of the three versions, you might need to edit the installation instructions. Maybe the design team changed the software installer and you need to include a different screenshot. Whatever the change, you now need to copy and paste the updated text across all versions. This might be okay for two or three versions of the software, but the process becomes tedious for much more than that.
With DITA, you write each unit of information (the description of each software version, the installation instructions, and the system requirements) just once, then you re-use that content by connecting them with a DITA Map.
Creating a DITA Map
I use the Oxygen XML Editor to manage my DITA projects, so that's what I'll use for this example. In this sample DITA project, I have these folders:
- Concepts
- Tasks
- References
You can locate your DITA Map anywhere in your project, but in this demonstration, I'll put it at the root of the project. Right-click on the folder name, and select New > File. Navigate in the file template tree to find DITA > Maps and select the Map template.
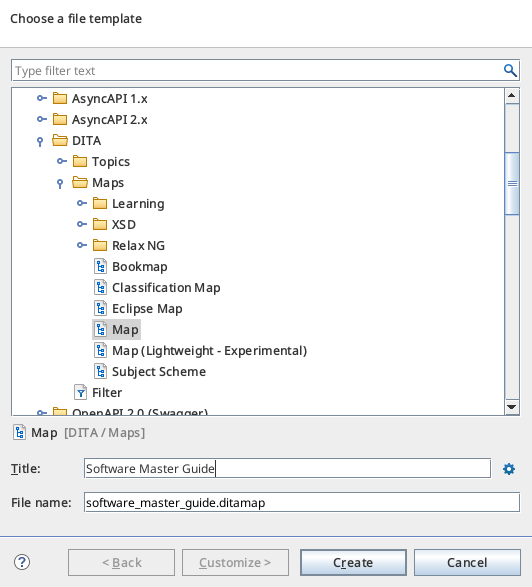
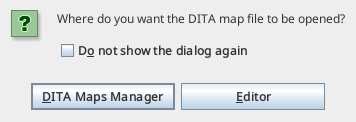
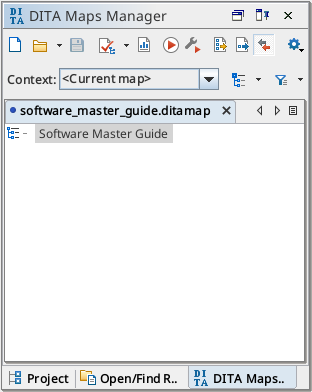
Give the Map file a title, and double-check the file name before you click Create. Oxygen will prompt you if you want to open the Map file in the XML editor view or the DITA Maps Manager. For Maps, it's easiest to use the DITA Maps Manager.
The DITA Maps Manager presents the DITA Map in a "tree" view, which allows you to reorganize topics by dragging the names to new positions in the Map.
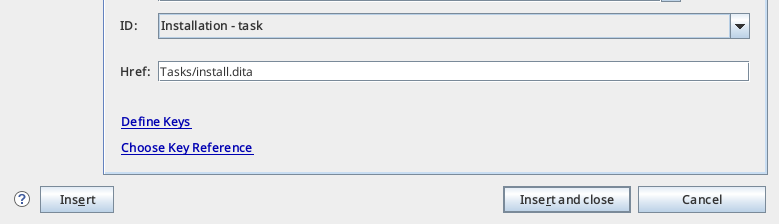
To add existing DITA topics into the DITA Map, right click on the Map name and select Append child > Reference. This inserts a reference to an existing DITA file into the Map.
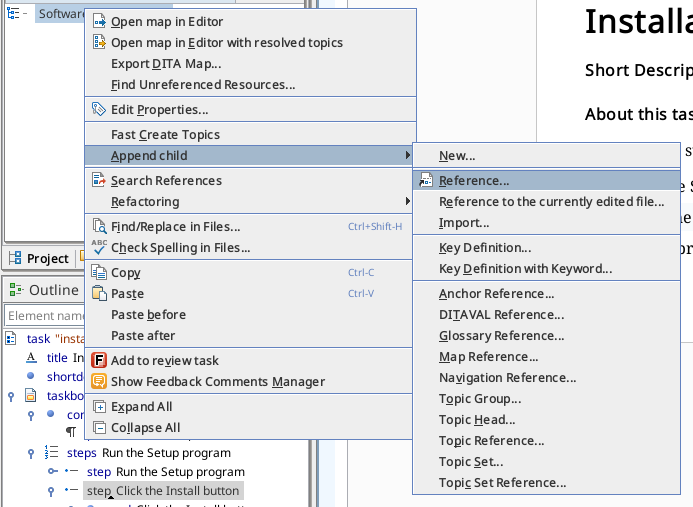
As you append each entry to the Map, you'll have the option to Insert or Insert and close. When you click Insert, you'll add the currently selected DITA file or files to the Map. If you click Insert and close, you'll add the reference and immediately close the file selector. Note that the Cancel button doesn't actually "cancel" or undo anything; this only closes the file selector. Borrowing the terminology used on this selector screen, the "Cancel" button should really have been named "Close."
I find it's easiest to insert all of the references that I need in my document, and rearrange them later. For this sample project, we will need to add references to each of the three Concepts (the three software versions), plus a set of installation instructions and system requirements for each. So after adding everything, I have references to three copies of each.
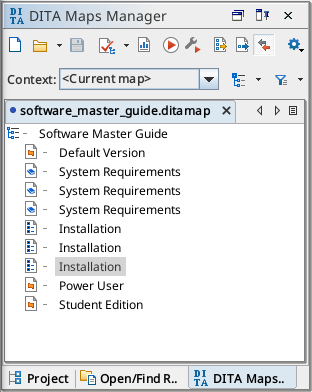
For the master reference document, I want to arrange the topics so each software version is its own "chapter." And each chapter should include a set of installation requirements and system requirements. Drag the topics on top of each other in the tree view to create the relationships you need. Just to show that you can create relationships that are more than one level deep, I've added the installation steps as a section within each software type, and the system requirements as a subsection of the installation instructions.

The power of transformations
The DITA Map provides the relationships between the DITA topics. Another way to think of this is the Map "strings together" the topics to create a full document. Each topic is a distinct piece of information, but the Map brings everything together.
DITA topics are just XML, and the DITA Map is yet another XML file. To turn this Map into a full document, we need to transform it. Oxygen provides a variety of output types that you can choose from, such as a responsive "help" website, a plain HTML or XHTML website, Markdown, EPUB, Kindle, Eclipse, and PDF. Click the little "wrench" icon in the DITA Maps Manager window to select the transformation you want; I used PDF.
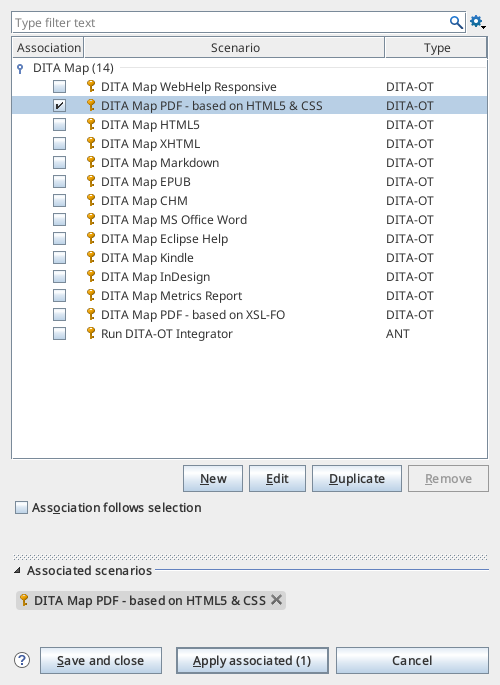
When you click the "play" button (the little red triangle) in the DITA Maps Manager window, Oxygen will perform the transformation in the background. This project generated a 5-page PDF document: a cover page, a table of contents, and three pages for the Default version, Student edition, and Power User edition.
Note we could further remix our DITA topics by creating a separate user guide for each of the software versions. This requires defining a separate DITA Map that strings together the content in the order you need. Creating a user guide for each version of the software needs three new DITA Map files, but we don't have to copy/paste any content because we can just reuse the existing content.
DITA can be a powerful tool for technical writers. If your projects require reusing and remixing content across documents, consider breaking up your content into DITA topic files, then bring everything together using a DITA Map.

Robin Bland is a technical writer in the Minneapolis/St Paul area.