 Code samples with GNU groff
Once you know how to turn off text "fill" and set the font, you can include code samples anywhere in your groff documents.
From its start as a document preparation system on the original Unix system, nroff (later troff, now groff) was often used to create documents that included source code. For example, The C Programming Language book by Brian W. Kernighan and Dennis M. Ritchie describes the C programming language, and includes lots of source code. The book was prepared entirely using troff.
Original nroff
The original Unix nroff produced documents for the Model 37 Teletype and similar typewriter-like devices. These printers used a fixed width character set, so every letter printed on a page was the same width. With this assumption, including source code in an nroff document was easy; disable line-filling and nroff would print text as verbatim:
.ti 5
Including source code in an nroff document simply required disabling
the "fill" feature, using the ".nf" ("no fill") command.
Here's a sample "Hello world" program to demonstrate:
.sp
.nf
#include <stdio.h>

int
main()
{
  puts("Hello world!");
  return 0;
}
.fi
.sp
.ti 5
When you're done with your source code sample, turn "fill" back on
with the ".fi" command.
The output looked like this:
$ nroff code.nro | head -15
     Including  source  code in an nroff document simply required
disabling the "fill" feature, using the ".nf"  ("no  fill")  com‐
mand. Here’s a sample "Hello world" program to demonstrate:

#include <stdio.h>

int
main()
{
  puts("Hello world!");
  return 0;
}

     When  you’re  done with your source code sample, turn "fill"
back on with the ".fi" command.
Adding fonts with troff
When the Unix team at Bell Labs purchased a Graphics Systems Model C/A/T typesetter, nroff became troff (the "t" stood for "typesetter"). The typesetter used a similar process to today's laser printers - at least, at a high level. In general, the C/A/T held four film strips that contained different fonts, and a Xenon strobe flashed the characters onto a drum that transferred text to the printed page.
Today, we think of a font like a typeface, such as Times New Roman; today's typefaces come in different styles such as italics or different weights such as bold. However, the C/A/T contained regular or "roman" style text on one film strip, the italics text on another strip, and so on for bold and bold-italics.
The C/A/T had four positions on which to attach the font films. To change fonts, you instructed the C/A/T to switch to a different font position: for example, "roman" text might be at font position 1. The Unix troff program adopted the font position terminology. Thus, troff could support four fonts ("roman," italics, bold, and bold-italics) which were defined at separate font positions.
A troff document could change to a specific font loaded in a particular position using the .ft instruction, giving a number to indicate the position of the font film that was loaded on the C/A/T. For example, .ft 1 would change the font to use whatever was at font position 1; using .ft without a number returned the output to the font that was in use previously.
Modern laser printers do not have the same limitation, but groff maintains the same terminology and .ft instruction. This sample groff document lists the first nine fonts loaded into the system. I'm not using a macro package to do the work for me; in fact, the document contains its own page setup. The first two lines set a 1-inch left margin ("page offset") and 6.5 inches per line ("line length"). The third line adds an inch of space at the top of the page. The .ce 9 instruction centers the next nine lines of output.
.po 1i
.ll 6.5i
.sp 1i
.ce 9
.sp
.ft 1
This is font 1
.sp
.ft 2
This is font 2
.sp
.ft 3
This is font 3
.sp
.ft 4
This is font 4
.sp
.ft 5
This is font 5
.sp
.ft 6
This is font 6
.sp
.ft 7
This is font 7
.sp
.ft 8
This is font 8
.sp
.ft 9
This is font 9
Process this with groff to generate a quick-reference page for your available fonts:
$ groff -Tps fonts.tro > fonts.ps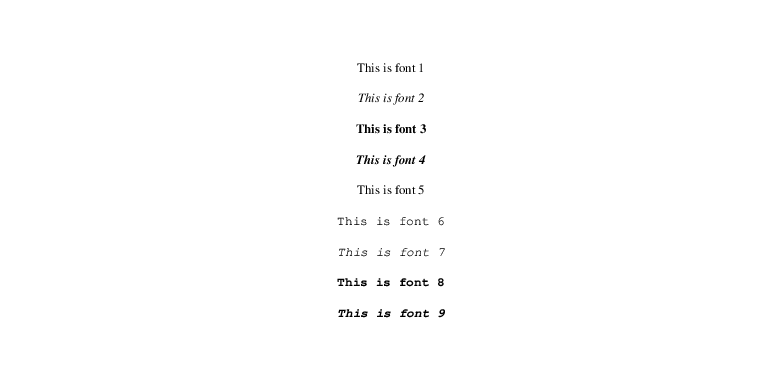
Putting it together: code samples in groff
We can combine these two concepts to include code samples in a groff document. Including source code in a document involves two steps:
- Turn off "fill" using the
.nf("no fill") instruction - Set the font to a monospace font (font position 6)
As long as your text doesn't include any groff instructions, the text will be inserted verbatim. When you're ready to go back to normal text, turn "fill" back on with the .fi instruction, and reset the font.
.po 1i
.ll 6.5i
.sp 1i
.ti .5i
Including source code in a groff document is a two step process:
Disable the "fill" feature, and set the font.
Here's a sample "Hello world" program to demonstrate:
.sp
.nf
.ft 6
#include <stdio.h>

int
main()
{
  puts("Hello world!");
  return 0;
}
.fi
.ft
.sp
.ti .5i
When you're done with your source code sample, turn "fill" back on
and reset the font.
If we process this sample document with groff, we'll find the source code inserted within the text:
$ groff -Tps code.tro > code.ps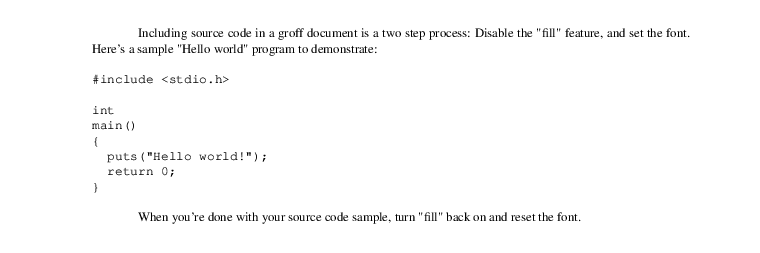
For inline code, you can change the font using the \f instruction. For example, \f1 sets the font to position 1. To change back to the previously-used font, use \fP instead:
.po 1i
.ll 6.5i
.sp 1i
In the C programming language, print a single line of text to the
screen with the \f6puts\fP function.
Process this file using groff to see the output:
$ groff -Tps inline.tro > inline.ps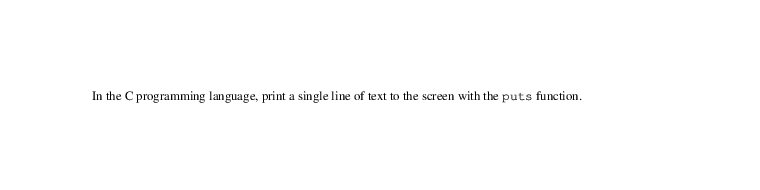

Jim Hall is an open source software advocate and technical writer. At work, Jim is CEO of Hallmentum, an IT executive consulting company that provides hands-on IT Leadership training, workshops, and coaching.