 4 retro tools I use in technical writing
Sometimes, an older tool is the right tool. Here are four retro tools I use all the time in technical writing.
Technical writers can choose from a variety of modern tools and technologies to do their job. HTML is a flexible system to create web content, DITA is a power tool when you need to remix and reuse content, and desktop word processors combine sophisticated features with ease of use.
But sometimes, going "old school" is the easiest way. Whether I just need to quickly edit a file, draft a simple document, or work on a remote system, these old but reliable tools can help me cross the finish line. Here are four retro tools I use all the time in my technical writing:
1. ed
The venerable ed text editor doesn't get a lot of love these days, but I often find it useful if I just need to type out a quick file. Despite the archaic commands and scrolling from the bottom of the screen, ed can feel quite natural. And once you know a few of the commands, you can navigate an editing session with ease.
The other day, a colleague asked for help with using grid in an HTML file. I switched to my terminal and wrote a sample HTML document that demonstrated how to create a header with an image on the left and right when the browser was full screen, but "stacked" when displayed on a mobile device. Here's how I used ed in a terminal session to create a simple HTML demonstration. Note that ed doesn't display a prompt by default, but I've added the P command in GNU ed to display an asterisk as a prompt, so you can see what commands I'm typing:
$ ed t.html
t.html: No such file or directory
P
*i
<!DOCTYPE html>
<html lang="en">
<head>
<title>Grid demo</title>
<style>
</style>
</head>
<body>
<header>
<figure><img src="a.png" alt="left image"></figure>
<div><h1>Your name</h1><nav><a href="#">links..</a></nav></div>
<figure><img src="b.png" alt="right image"></figure>
</header>
<main><p>The rest of your text goes here..</p></main>
</body>
</html>
.
*?<style
<style>
*a
header { background-color: ghostwhite; text-align: center; }
figure { margin: 0; }
figure>img { display: block; margin: 0 auto; }
figure>img { height: 100px; width: 100px; background-color: pink; }
@media only screen and (min-width:800px) {
header { display: grid; grid-template-columns: 100px auto 100px; }
}
.
*/<style
<style>
*i
<meta name="viewport" content="width=device-width, initial-scale=1">
.
*w
734
*qThis ed session will make sense with this primer of the few commands I use most of the time to edit files:
- The
icommand starts inserting text before the current line. For an empty file, this starts entering new lines. Similarly, theacommand appends text after the current line. When you are done typing text, enter.on a line by itself. - To search for text in the file, use
?to search backwards or/to search forwards in the file. If the text is not found in the following lines, GNU ed will continue the search from the start of the file. - Write the file to the system using the
wcommand, and quit the editor with theqcommand.
In this example, I wrote the outline of an HTML file, but initially left the stylesheet empty. After entering the sample HTML code, I searched backwards for the start of the empty stylesheet, then appended a few lines of CSS. After that, I realized I forgot to set the initial viewport, so I again searched for the start of the stylesheet and inserted a meta statement to define the viewport.
2. vi
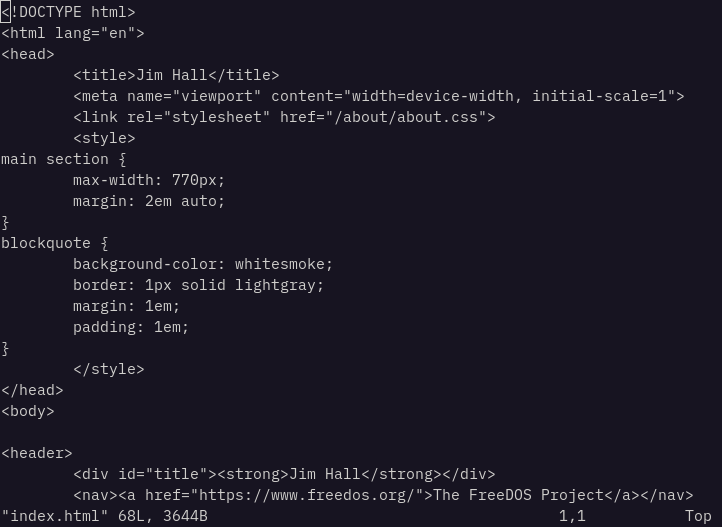
I use a content management system to write articles, but I prefer to keep my HTML skills sharp by writing my personal website "by hand." The easiest way for me to do that is to open a terminal to the web server and use the vi editor to update my web pages.
vi is most commonly implemented on Linux systems as the Vim editor, which is backwards compatible with the original Unix vi editor. The name is an abbreviation for "visual editor" because it worked with screen-addressable terminals to display the file for editing. The vi editor commands are similar to ed's; if you know ed, you also know vi, and vice versa.
Many people find vi easier to use than ed because you can use the arrow keys on your keyboard to navigate the file. To start editing the file, type i to insert text at the cursor's current position, or I to start typing from the start of the line. The a and A commands work in a similar way to append text to the file. When you're done entering text, tap the Esc key to go back to "command" mode.
3. fmt
I sometimes write articles and other documents using Markdown. I like using Markdown because it uses minimal markup, so I can focus on the content of my writing rather than the tags required for the document structure. When I'm writing a document that only requires section headings, links, and bold and italics formatting, Markdown lets me write the text without worrying about using the right tags.
With Markdown, you can make text bold by surrounding the words with two asterisks, or italics with one asterisk. Start new paragraphs by adding a blank line.
After working on a Markdown file for a while, especially after lots of editing, my lines might look quite messy. While the output will be transformed into HTML, I prefer to keep my files looking today.
The fmt command dates back to the days of BSD Unix. As the name suggests, fmt applies simple formatting to a text file, effectively refilling paragraphs to a consistent length. On Linux, fmt has many command line options, but the defaults are usually fine for my needs. For example, use fmt to reformat a Markdown file so the lines are about 75 columns wide:
$ cat t.md
This is a sample file in Markdown.
I like using Markdown for certain kinds of technical writing because it
lets me focus on my *content* and not so much on the
*formatting* to make it look a certain way.

To start a new paragraph in Markdown, add
an empty line.
$ fmt t.md > t.new
$ cat t.new
This is a sample file in Markdown.  I like using Markdown for certain
kinds of technical writing because it lets me focus on my *content*
and not so much on the *formatting* to make it look a certain way.

To start a new paragraph in Markdown, add an empty line.4. nroff
Sometimes, a plain text file is enough. That's when I go old-school and format my document with the original Unix classic, nroff. The nroff document preparation system (implemented on Linux systems at GNU groff) supports a ton of options to make documents look just the way you like. By default, the modern troff or groff commands generate Postscript output, suitable for printing on a laser printer. But the original nroff command operates in plain text.
While you can use the many dot commands or requests to create complex formatting such as columns or underlined text, I often rely on the default action that empty lines are inserted verbatim.
You can use nroff to apply a little extra formatting that fmt won't do. For example, you can center a line of text, like the title of a document, using the .ce command. When writing plain text documents this way, I also add .nh at the top of my file to turn off hyphenation, .na to prevent nroff from adding spaces between words to create "adjusted" paragraphs, and .pl 1 to set the "page length" to one line, thus preventing nroff from adding a bunch of blank lines to my output file:
$ cat myfile
.nh
.na
.pl 1
.ce
This is a sample file written as plain text.

Sometimes, plain text is all you need for the job. And while you
can edit a text file in any editor, you may not be able to balance
lines to fill out paragraphs.

The fmt command can do this job very well. But if you want your file
to look extra nice,
with extra spaces on each line to create fully adjusted paragraphs,
consider using nroff.
You don't have to use "dot commands" to format documents in nroff,
but it helps to use the ".nh" ("no hyphen") command to turn
off hyphenation.
$ nroff myfile
          This is a sample file written as plain text.

Sometimes, plain text is all you need for the job. And while you
can edit a text file in any editor, you may not be able to
balance lines to fill out paragraphs.

The fmt command can do this job very well. But if you want your
file to look extra nice, with extra spaces on each line to create
fully adjusted paragraphs, consider using nroff.  You don’t have
to use "dot commands" to format documents in nroff, but it helps
to use the ".nh" ("no hyphen") command to turn off hyphenation.
Jim Hall is an open source software advocate and technical writer. At work, Jim is CEO of Hallmentum, an IT executive consulting company that provides hands-on IT Leadership training, workshops, and coaching.