 3 image tools I use for technical writing
Including a diagram, chart, or other image can make your writing more clear.
As the old saying goes, "a photo is worth a thousand words." A diagram in a "how-to" document can explain how one piece connects with another. A chart can explain data and trends in a technical report. An image or photo can provide a visual representation of a concept.
As a technical writer, I rely on several image tools to create and modify images. Here are three tools I use all the time:
1. Google Slides to create diagrams
Sometimes I can explain a concept well enough using words. But most of the time, I need a diagram to make my point clear. Even a simple drawing or diagram will help clarify a technical document or "how-to" article.
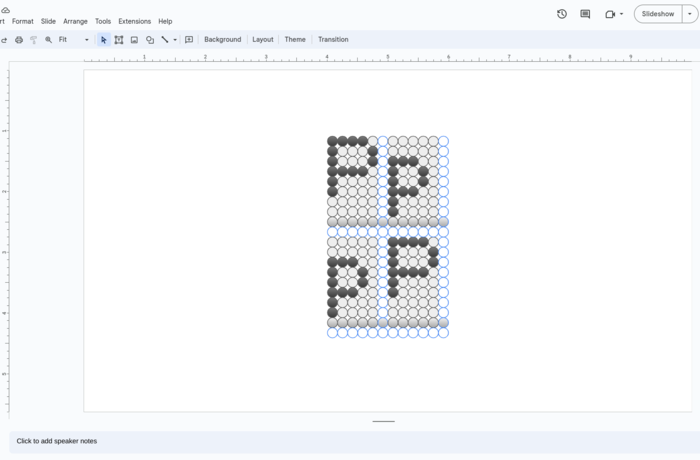
For example, I recently started writing an article about how dot matrix printers work, as a follow-up to an earlier article about dot matrix printers. To explain how these printers generated text using only a vertical array of nine dots (in a print head) that scans across the page, I decided to include a diagram to demonstrate the sample output of an ideal dot matrix printer.
I needed a tool that would allow me to create multiple circles in a grid, and set a background color and border color for each. I created a 5×9 grid of dots that defines a single character, either uppercase or lowercase, with a single empty column between letters and a single empty row between lines of output.
I opened up an empty presentation in Google Slides and used the drawing tools to create a circle, then copied that circle multiple times to create a grid of blue dots. Then I selected a 5×9 grid of these dots and shaded them gray. To create the appearance of uppercase and lowercase letters, I shaded these dots a very dark gray.
Google Slides isn't a very sophisticated drawing tool, but it does the job just fine. When I've finished my image, I grab a screenshot of the image, and include that in my article.
Google Slides is part of the Google Docs suite. For more information, visit Google Slides.
2. GIMP to crop and resize images
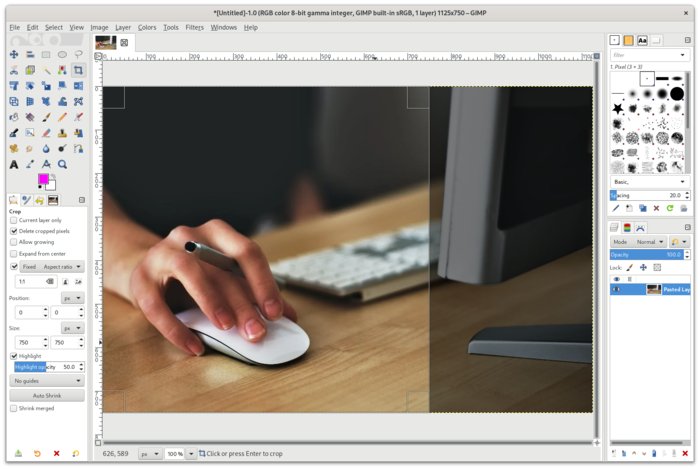
It's great if I find an image in the size that I need. But that's pretty rare. Usually, I'll need to crop the image to just focus on one part of the photo or diagram, or resize it to better fit the space I'm working in.
I use GIMP, the GNU Image Manipulation Program to do all my interactive image editing. GIMP is an open source cross-platform photo and image editor available for Linux, macOS, and Windows. If you've used Photoshop before, you know how to use GIMP.
I don't know all the features of GIMP, but I know enough to manipulate layers, copy, paste, flatten, crop, text, and apply the filters that I need. GIMP has a ton of other features that I don't use, but others might, including transformations, stretches, smudges, and clone. The list goes on.
To download a version of GIMP for your preferred platform, visit GIMP.org.
3. ImageMagick to process batches of images
Sometimes I need to manipulate a collection of images at the same time. For example, I might generate several screenshots of an app I'm working on. The screenshots are all full-size, but these only need to be 700 or 800 pixels wide when I publish them in an article.
To modify a collection of images, I use the ImageMagick suite of tools. These are a set of open source command line tools to manipulate photos and other images. The commands I use the most often are convert to resize images and montage to combine multiple images into one. For example, to resize a single screenshot image so to be 700 pixels wide, I open a terminal window and type this command:
$ convert screenshot.jpg -resize 700x image.pngThe -resize 700x instruction means ImageMagick will resize the image to be 700 pixels wide, and to maintain the same aspect ratio to the new height.
Using the for loop instruction on the Linux command line, I can resize several images at once:
$ ls
gimp.png  imagemagick.png  slides.png
$ identify *.png
gimp.png PNG 1606x1077 1606x1077+0+0 8-bit sRGB 735123B 0.000u 0:00.000
imagemagick.png PNG 965x679 965x679+0+0 8-bit sRGB 111679B 0.000u 0:00.001
slides.png PNG 1507x991 1507x991+0+0 8-bit sRGB 151408B 0.000u 0:00.000
$ mkdir 700px
$ for img in *.png ; do convert $img -resize 700x 700px/$img ; done
convert: profile 'icc': 'RGB ': RGB color space not permitted on grayscale PNG `700px/imagemagick.png' @ warning/png.c/MagickPNGWarningHandler/1526.
$ identify 700px/*.png
700px/gimp.png PNG 700x469 700x469+0+0 8-bit sRGB 245118B 0.000u 0:00.000
700px/imagemagick.png PNG 700x493 700x493+0+0 8-bit Grayscale Gray 94448B 0.000u 0:00.000
700px/slides.png PNG 700x460 700x460+0+0 8-bit sRGB 71955B 0.000u 0:00.000For more information, including an online manual, visit ImageMagick.org.

Jim Hall is an open source software advocate and technical writer. At work, Jim is CEO of Hallmentum, an IT executive consulting company that provides hands-on IT Leadership training, workshops, and coaching.