 How I wrote academic papers in groff -me
Learn simple macros to add footnotes, blockquotes, lists, subheads, and other formatting for your academic papers.
I am of the generation that grew up using the DOS operating system. Throughout the 1980s and into the 1990s, I used DOS for everything. When I entered university in the early 1990s, I got a Unix account in the campus computer lab. At the time, I approached Unix as a more powerful version of DOS: you ran everything from the command line.
In 1993, I downloaded a new version of "Unix" for personal computers, called Linux. Linux was equally as powerful as the Unix systems in the computer lab, except I could run it at home. But in the early 1990s, Linux lacked desktop applications like a word processor. If I wanted to use a word processor, I booted my computer system back into DOS and used WordPerfect or another DOS word processor program.
I found myself at a crossroads: I needed to write papers for my classes, but I preferred working in Linux. I had a passing familiarity with the nroff and troff programs from using the "big Unix" systems, but I'd never really used them to create documents, only to view files that others sent me. But I decided that if I wanted to write class papers from Linux, I needed to learn the basics of writing documents using this standard Unix tool.
Using GNU groff
On Linux, nroff and troff are combined as GNU troff, more commonly known as groff. I was happy to see a version of groff included in my early Linux distribution, so I set out to learn how to use it to write class papers. The first macro set I learned was the -me macro package, a straightforward, easy to learn macro set.
The first thing to know about groff is that it processes and formats text according to a set of macros. A macro is usually a two-character command, set on a line by itself, with a leading dot. A macro might carry one or more options. When groff encounters one of these macros while processing a document, it will automatically format the text appropriately.
Below, I'll share the basics of using -me to write simple documents like class papers. If you're just writing academic papers, you can stick to these basics and avoid the more esoteric stuff like how to create nested lists, keeps and displays, tables, and figures.
Paragraphs
Let's start with an easy example you see in almost every type of document: paragraphs. Paragraphs can be formatted as either block paragraphs that start against the left margin, or as indented paragraphs with the first line indented by a few spaces. Many printed documents, including academic papers, magazines, journals, and books, use a combination of the two types, with the first (leading) paragraph in a document or chapter formatted as a block paragraph and all other (regular) paragraphs indented. In -me, you can use both paragraph types: leading paragraphs (.lp) and regular paragraphs (.pp).
.lp
You can easily create block paragraphs in groff using the
"lp" macro. This is a leading paragraph, usually used
after starting a new chapter or section in a document.
.pp
You can create indented paragraphs in groff using the "pp"
macro. This is a paragraph where the first line is indented
by a few spaces before the start of the text.
Basic formatting
Bold and italic text cover most of the formatting needs in academic papers. In -me, the macro to format text in bold is .b and to format in italic is .i. If you put .b or .i on a line by itself, then all text that comes after it will be in bold or italic. But it's more likely you just want to format a word or phrase. To format one or more words using bold or italic text, put that word on the same line as .b or .i, use quotes if it's more than one word:
.pp
You can format text using
.i italics
and
.b "bold text."
In the above example, the period at the end of "bold text." will also be in bold type. In most cases, that's not what you want. It's more correct to only have the words in bold, but not the trailing period. To get the effect you want, you can add a second argument to .b or .i to indicate any text that should trail the bolded or italicized text, but in normal type. For example, you might do this to ensure that the trailing period doesn't show up in bold type:
.pp
You can format text using
.i italics
and
.b "bold text" .
Lists
With -me, you can create two types of lists: bullet lists (.bu) and numbered lists (.np). Numbered lists increment their number automatically, and will automatically reset to one after the next normal paragraph.
.lp
Describe how you conducted your research in the Methods
section of your paper. You might use several kinds of
resources for this, including:
.bu
Electronic sources
.bu
Print sources
.bu
Empirical sources
.pp
When describing data, you might use a data display to
show the information visually. Three ways to show data
visually are:
.np
Tables
.np
Charts
.np
Graphs
Section headings
If you're writing a long paper, you might want to divide your content into sections. With -me, you can create numbered headings (.sh) and unnumbered headings (.uh). In either, enclose the section title in quotes as an argument. For numbered headings, you also need to provide the heading level: 1 will give a first-level heading (using a numbered heading like "1."). Similarly, 2 and 3 will give second and third level headings, as needed.
.lp
You can easily create block paragraphs in groff using the
"lp" macro. This is a leading paragraph, usually used
after starting a new chapter or section in a document.
Or this example for an unnumbered section:
.uh "Works Cited"
.lp
List any references in this section.
Note that this is part of the back matter of the document.
Inline and block quotes
It's standard in any academic paper to cite other people's work as evidence. If you're citing a brief quote to highlight a key message, you can just type quotes around your text. But groff won't automatically convert your quotes into the "curly" quotes used by modern word processing systems. To create them in -me, use an inline macro to create the left quote (\*(lq) and right quote mark (\*(rq) around your text. There's also a shortcut in -me to create these quotes (.q) that I find easier to use:
.pp
Using quotes in an academic paper is a great way to support
your findings or arguments.
You can include \*(lqinline quotes\*(rq or
.q "inline quotes"
to cite a short quote from a source.
If you're citing a longer quote that spans several lines, you'll want to use a block quote. To do this, insert the blockquote macro at the beginning (.(q) and end (.)q) of the quote:
.pp
For longer quotations,
use a block quote like this placeholder text:
.(q
Sed ut perspiciatis unde omnis iste natus error sit voluptatem
accusantium doloremque laudantium, totam rem aperiam, eaque
ipsa quae ab illo inventore veritatis et quasi architecto
beatae vitae dicta sunt explicabo.
.)q
Footnotes
To insert a footnote, include the footnote macro before (.(f) and after (.)f) the footnote text, and use an inline macro (\**) to add the footnote mark. The footnote mark should appear both in the text and in the footnote itself:
.pp
For longer quotations,
use a block quote like this placeholder text:\**
.(f
\**Cicero,
.i "de Finibus Bonorum et Malorum" ,
45 BCE
.)f
.(q
Sed ut perspiciatis unde omnis iste natus error sit voluptatem
accusantium doloremque laudantium, totam rem aperiam, eaque
ipsa quae ab illo inventore veritatis et quasi architecto
beatae vitae dicta sunt explicabo.
.)q
Cover page
Most class papers require a cover page containing the paper's title, your name, and the date. Creating a cover page in -me requires some assembly. I find the easiest way is to do it manually before I write any headings or paragraphs, using centered blocks of text and adding a few extra lines between the title, name, and date. At the top of your paper, start with the title page (.tp) macro, insert five blank lines (.sp 5), then add the centered text (.ce), and extra blank lines (.sp 2) between my name and class information.
.tp
.sp 5
.ce
.b "UK Habitats of the Canadian Goose"
.sp 2
.ce
A. Student
.sp 2
.ce
English 101: Introduction to Writing
.sp 2
.ce
Dr. P. Rofessor
.sp 2
.ce
March 1, xxxx
.bp
The last macro (.bp) tells groff to add a page break after the title page.
Printing a final document
Let's say I've finished the final draft of my paper, which looks like this:
.tp
.sp 5
.ce
.b "UK Habitats of the Canadian Goose"
.sp 2
.ce
A. Student
.sp 2
.ce
English 101: Introduction to Writing
.sp 2
.ce
Dr. P. Rofessor
.sp 2
.ce
March 1, xxxx
.bp
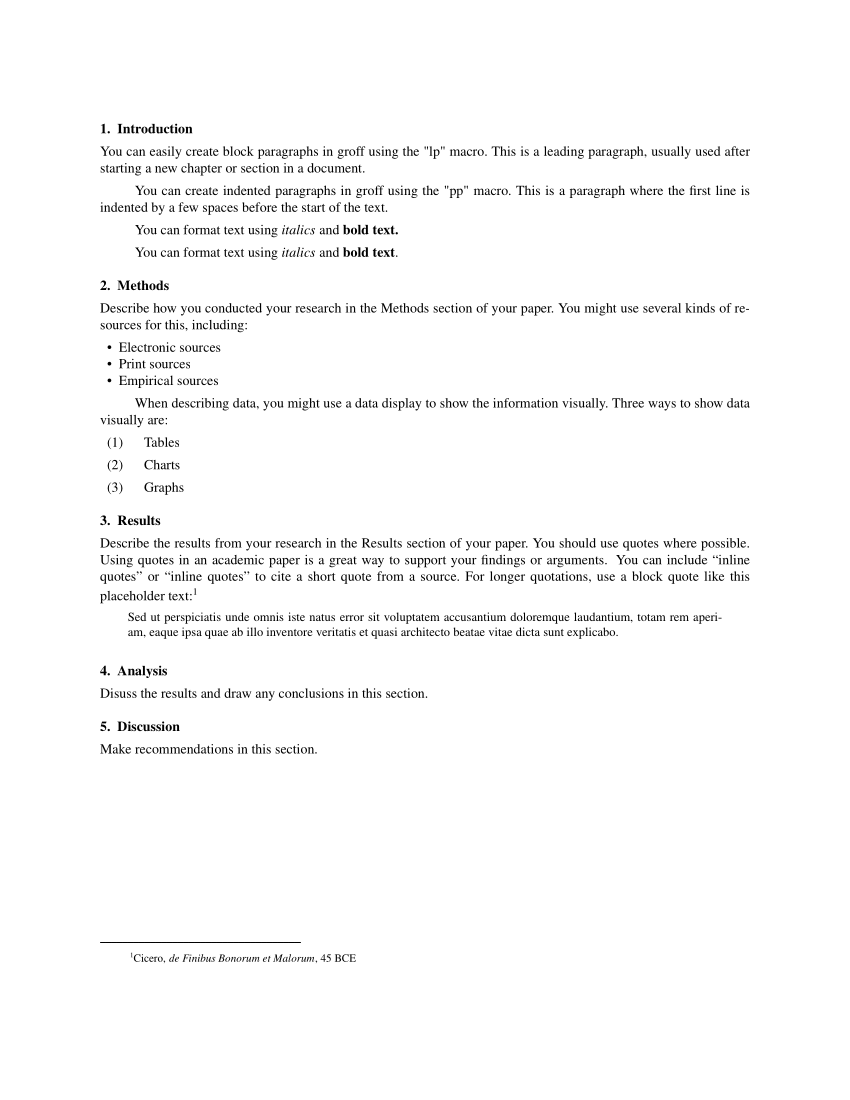
.sh 1 Introduction
.lp
You can easily create block paragraphs in groff using the
"lp" macro. This is a leading paragraph, usually used
after starting a new chapter or section in a document.
.pp
You can create indented paragraphs in groff using the "pp"
macro. This is a paragraph where the first line is indented
by a few spaces before the start of the text.
.pp
You can format text using
.i italics
and
.b "bold text."
.pp
You can format text using
.i italics
and
.b "bold text" .
.sh 1 Methods
.lp
Describe how you conducted your research in the Methods
section of your paper. You might use several kinds of
resources for this, including:
.bu
Electronic sources
.bu
Print sources
.bu
Empirical sources
.pp
When describing data, you might use a data display to
show the information visually. Three ways to show data
visually are:
.np
Tables
.np
Charts
.np
Graphs
.sh 1 Results
.lp
Describe the results from your research in the Results
section of your paper. You should use quotes where possible.
Using quotes in an academic paper is a great way to support
your findings or arguments.
You can include \*(lqinline quotes\*(rq or
.q "inline quotes"
to cite a short quote from a source. For longer quotations,
use a block quote like this placeholder text:\**
.(f
\**Cicero,
.i "de Finibus Bonorum et Malorum" ,
45 BCE
.)f
.(q
Sed ut perspiciatis unde omnis iste natus error sit voluptatem
accusantium doloremque laudantium, totam rem aperiam, eaque
ipsa quae ab illo inventore veritatis et quasi architecto
beatae vitae dicta sunt explicabo.
.)q
.sh 1 Analysis
.lp
Disuss the results and draw any conclusions in this section.
.sh 1 Discussion
.lp
Make recommendations in this section.
.bp
.uh "Works Cited"
.lp
List any references in this section.
Note that this is part of the back matter of the document,
so the section should start on a new page. Use the "bp"
macro to insert a break page instruction. Do the same for
any other back matter sections, like Appendices.When you're done writing your document, you can print it to your printer. When I was an undergraduate student in the 1990s, dot matrix printers were common; I had an Epson FX-80 attached to my printer at home and the computer lab had a dot matrix printer students could use for free. The campus computer lab also provided a Postscript laser printer, but students had to pay per page to use it.
For most of my papers, printing to the dot matrix printer was good enough. I could print at home with my nice printer, using up my ribbon and paper, or I could print my document for free from the campus computer lab. To generate text suitable for a dot matrix printer, use the nroff version of the groff processor:
$ nroff -me paper.me > paper.txtIf I wanted to print a paper on the laser printer, I would first need to generate a Postscript file using the groff -Tps command:
$ groff -Tps -me paper.me > paper.psThese days, I usually don't want to print a hard copy, I just want to generate a PDF file that I can view on my computer. The modern groff has a PDF output option, but I am still "old school" and prefer using the two-step process of generating a Postscript file, then converting that file to PDF:
$ groff -Tps -me paper.me > paper.ps
$ ps2pdf paper.ps
Here's what my sample paper looks like when converted to PDF:
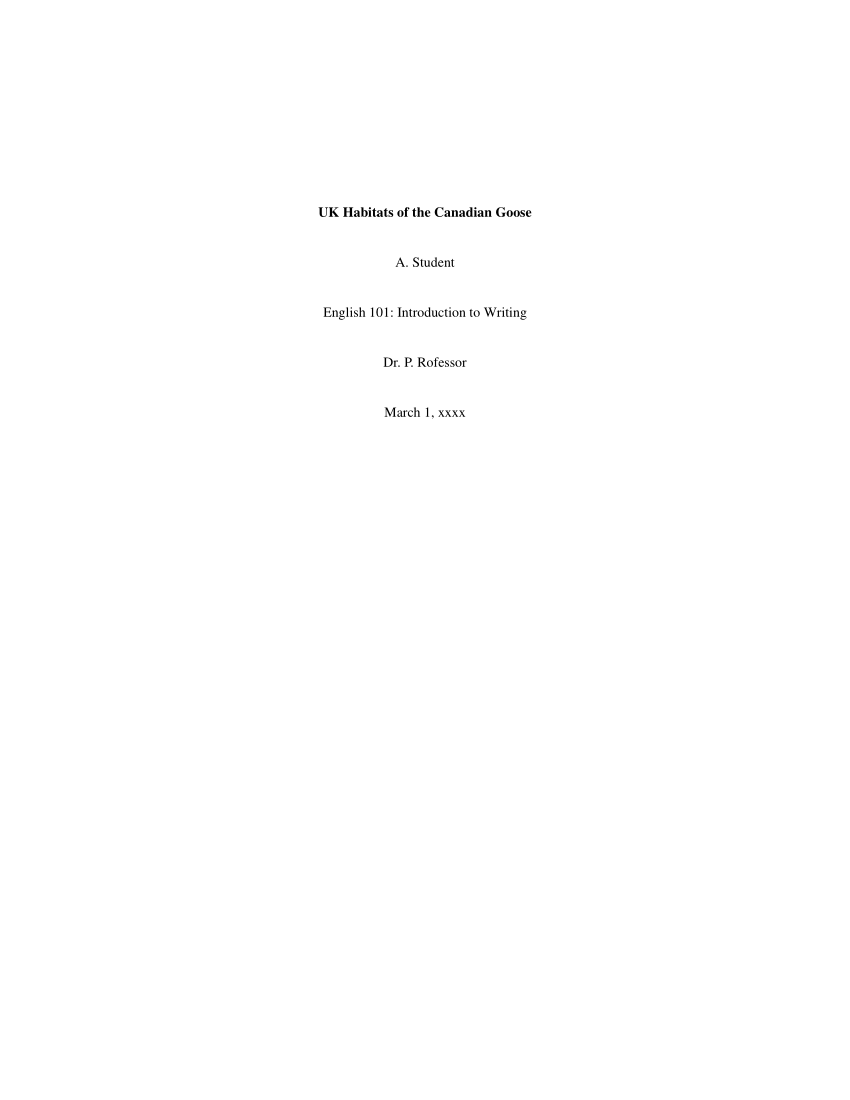
The first page after the cover page:
The last page:

If you'd like to use more advanced functions in -me, refer to Eric Allman's "Writing Papers with Groff using -me," which you should find on your system as meintro.me in the /usr/share/doc/groff directory. It's a great reference document that explains other ways to format papers using the -me macros, including .ls 2 to set double line spacing, and number registers to set the font size for paragraphs, quotes, footnotes, and titles.

Jim Hall is an open source software advocate and technical writer. At work, Jim is CEO of Hallmentum, an IT executive consulting company that provides hands-on IT Leadership training, workshops, and coaching.