 How dot matrix printers created text
Learn more about the dot matrix printer with this simulation of a past era.
The impact printer was a mainstay of the early desktop computing era. Also called “dot matrix printers,” these printers could print low-resolution yet very readable text on a page, and do so quickly and at a low price point. But these printers are a relic of the past; in 2024, you might find them printing invoices or shipping labels, although more frequently these use cases have been replaced by other types of printers such as thermal printers and laser printers.
Epson produced several popular impact printers from the late 1970s, throughout the 1980s, and into the 1990s. The MX-80 (1980) and FX-80 (1984) were two of their most popular models, found in offices and homes everywhere. Both became the “workhorse” of everyday printing needs until low-cost laser printers and inkjet printers replaced them.
From dots to text
The heart of the impact printer is the print head. The print
head contained a column of pins (9 pins was common) that moved across
the page. Software in the printer controlled when to strike these pins
through an inked ribbon to place a series of “dots” on a page. By
carefully timing the pin strikes with the movement of the print head,
the printer could control where each dot was placed. A column of dots
might represent the vertical stroke of the letter H, a
series of single dots created the horizontal bar, and another column
would create the final vertical stroke.
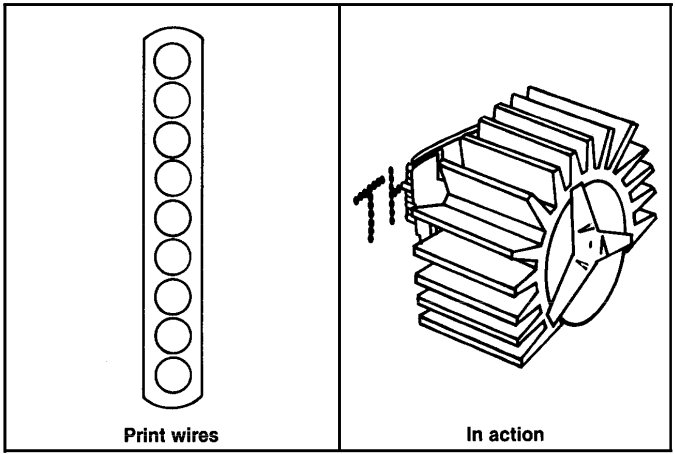
(image: Epson FX Series Printer User’s Manual, Volume 1 Tutorial, p. 50, David A. Kater, Epson America, 1984)
Like other impact printers, the Epson series of dot matrix printers used a 6x9 grid to arrange the dots for each letter. Dots could also be printed halfway between each vertical line on the grid, effectively providing a higher resolution of 12x9 for each printed character.
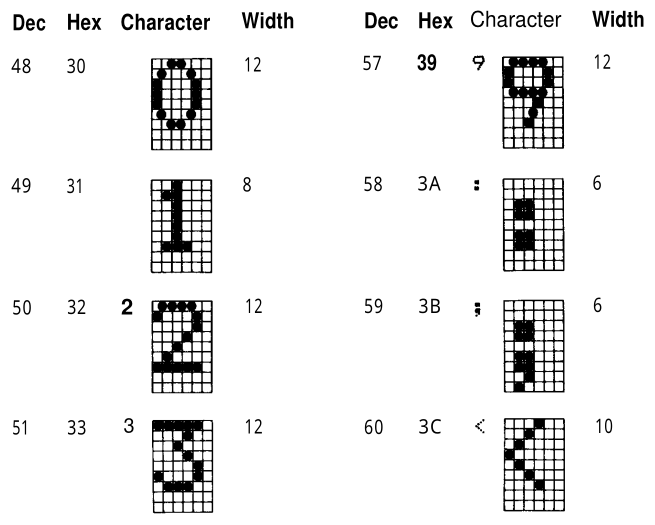
(image: Epson FX Series Printer User’s Manual, Volume 2 Reference, p. 259, David A. Kater, Epson America, 1984)
This method of moving a print head across the page, placing dots in a 12x9 matrix to create characters, produced readable text very quickly.
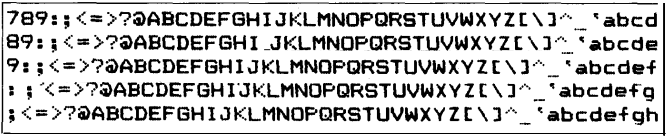
(image: Epson MX-80F/T Operation Manual, p. 22, Epson, Shinshu Seiki Co., 1981)
The Epson series also supported other print styles, including italic and bold text. But let’s focus on standard printing, called roman print style.
Simulating an impact printer
To better understand how impact printers generated text, we can create a program to simulate an ideal dot matrix printer. To create this example, we’ll make a few simplifying assumptions: This virtual printer will use a 6x9 character matrix for each character. We’ll always leave the last column as blank, to provide a small gap between letters.
Assuming ten characters per inch (pica pitch, a common print width), this means a US Letter page (8 1/2 x 11 inches) will have 85 characters per line. If each character matrix is 6x9, we can calculate the printer’s horizontal resolution at 60 dots per inch.
We’ll also reserve the bottom row for a dedicated underline feature, and leave a single “dot” height between lines. That means each line requires ten vertical dots: eight for characters, one for underline, and one for the line gap.
If we assume the same resolution vertically as horizontally, we can calculate the number of lines for US Letter at 66 lines per page.
With these values, the total resolution of a printed US Letter page is:
- (60 dots/inch) x (8 1/2 inches) = 510 dots horizontally
- (60 dots/inch) x (11 inches) = 660 dots vertically
Overview of the program
We can use these assumptions to simulate a simple impact printer,
using a 5x9 character matrix with 85 characters per line and 66 lines
per page. To reduce programming overhead, I find it’s easier to write
using the OpenWatcom C compiler on FreeDOS. For example, we can put the
display into graphics mode using OpenWatcom’s _setvideomode
function, and functions like _setpixel to draw a single
pixel to the screen.
At a high level, the program will need to read files from the input. For each character in the file, the program will need to “print” that to the virtual “page.” Isolating each feature into a separate function will make it easier to create the program while keeping things as simple and as readable as possible. Using pseudocode, the program might have this overview:
main() {
  1. put display into graphics mode

  2. initialize the virtual "printer" with init_printer
     and set up the first page with new_page

  3. open each file

  4. use print_file to print it

  5. reset the display to text mode
}

init_printer() {
  set initial values for the printer
}

new_page() {
  1. clear the screen

  2. move the "print head" to the home position
}

print_file() {
  1. read characters from the file

  2. print them using print_char
}

print_char() {
  if the ASCII value is a control character (0 to 31):
    * if carriage return: move the "print head" to the left

    * if new line: move the "print head" to the next line

  if the ASCII value is 32 or higher:
    print it using print_byte
}

print_byte() {
  1. read 8 bit patterns from the "firmware"

  2. print them

  if the "print head" moves off the right side of the page:
    start a new line

  if the "print head" moves off the bottom of the page:
    start a new page
}
That provides an overview of the core functionality of the program. We’ll need to provide other supporting functions, but this is overhead. The high level pseudocode is meant to show how the program operates, with the most important moving parts. Let’s examine some of these other functions more closely:
Printing characters
Impact printers like the FX-80 stored the character set in ROM (Read Only Memory), also called firmware. Epson makes this note in the FX-80 user manual:
If you look through Appendix A, you’ll notice that none of the FX’s characters use dots in consecutive main and intermediate columns in the same row. There is a reason for this: the printer’s speed. The FX recalls a character’s dot-matrix pattern from ROM and prints it in 1/160th of a second. At that speed, the print head is simply moving too fast to pull the pins back and forth in time to print an overlapping dot. This fact is critical when you design characters, as you will see in Chapter 15.
emphasis mine (Volume 1 Tutorial, p. 52)
To simulate an impact printer, we can imagine these characters stored in memory, such as in a large array. With the 6x9 character matrix, and only the first 5x8 dots used for characters, this effectively means the virtual firmware only needs to store a series of five bytes to define each character in ROM. (A byte is 8 bits, and a bit is an on/off value.)
Creating the letter forms is a lot of work, which we can skip for
this demonstration. Instead, let’s “fake” reading the data from firmware
by simply printing the bit pattern of each character’s ASCII value. For
example, the capital letter A has the ASCII value of 65, or
the binary value 1000001. Lowercase a has
the ASCII value of 97, or binary 1100001. And so on for
other printable characters from ASCII 32 (space) and above.
We can use this C code to store the bit patterns into “firmware” as array values:
    for (asc = 32; asc <= 127; asc++) {
        for (line = 0; line < 5; line++) {
            if (asc == 32) {
                Printer.ascii[line] = 0; /* space */
            }
            else {
                Printer.ascii[((asc-32)*5)+line] = asc;
            }
        }
    }
We can retrieve values from this “firmware” to print characters in the virtual printer. With this assumption, we can write a function to print a single 8-bit value through the print head:
void print_byte(byte_t b)
{
    int off;

    if (b) {
        _setcolor(1); /* blue */

        for (off = 0; off < 8; off++) {
            if (b & (1<<off)) {
                /* ypos describes the "top" of the "print head" so we
                    need to do some math to print pixels correctly */
                _setpixel(Printer.xpos, Printer.ypos + (7-off));
            }
        }
    }

    /* only if text mode, add underline at 9th line */
    if ((Printer.is_graphics == false) && (Printer.is_underline == true)) {
        _setcolor(2); /* green */
        _setpixel(Printer.xpos, Printer.ypos+8);
    }

    /* advance the print head by 1px */
    /* if we reached the end of the line, wrap to the next line */

    if (++Printer.xpos > Printer.pxwidth) {
        new_line();
        Printer.xpos = 0;
    }
}
The function relies on some global values like
Printer.xpos and Printer.ypos to track the
position of a virtual “print head” on the simulated page. We will define
these global values later; for now, know that the Printer
variable and its elements store parameters about the printer and the
printed page.
With the print_byte function, we can write another
function to generate a printable character in video mode on DOS:
void print_char(int ch)
{
    int i;

    /* element 0 in the Printer.ascii array is ascii 32, and
        the printable ascii elements are 32 .. 127 */

    if (ch < 32) {
        /* control codes */
        switch(ch) {
        case '\r': /* CR */
            Printer.xpos = 0;
            break;
        case '\n': /* NL */
            new_line();
            break;
        /* add others here */
        }
    }
    else { /* 32 or greater */
        if (ch > 127) {
            /* extended ascii .. these are 8x6 chars, no space */
            /* fake it .. print a 6-px box */

            for (i = 0; i < 6; i++) {
                print_byte(255); /* filled */
            }
        }
        else { /* 32 to 127 */
            /* printable ascii .. these are 8x5 + 1px space*/
            /* retrieve the bit-patterns from "firmware" */

            for (i = 0; i < 5; i++) {
                print_byte(Printer.ascii[((ch-32)*5)+i]);
            }

            /* add a space between letters */
            print_byte(0); /* space */
        }
    }
}
I have included comments to help aid readability. At a high level,
the function compares the ASCII value: if it is 0 to 31, the code is
ignored - with the exception of ASCII 13 (\r) which
generates a carriage return, and ASCII 10 (\n) to produce a
new line. If the ASCII value is 32 or greater, the function reads the
bit patterns from firmware to print the character to the page.
Printing files
Printing a text file to this virtual printer requires reading each
character from the file, one at a time, and printing it to the page. The
print_char function prints the characters and interprets carriage
returns and new lines. In turn, the print_byte function
prints the bit patterns for each character, and advances the print head
from left to right, and inserts a new line if it reaches the right side
of the page.
void print_file(FILE *in)
{
    int ch;

    while ((ch = fgetc(in)) != EOF) {
        print_char(ch);
    }
}
A more efficient way to read data from a file is to use
fread, which reads a block of data at one time, the
performance impact of reading characters one at a time from a file won’t
be noticeable in this application.
Putting it all together
At over 300 lines, the program is remarkably short for what it does. The program reads data from files, and prints them to a virtual printer using the graphics mode of the display. The complete program can be compiled using OpenWatcom C on FreeDOS:
#include <stdio.h>
#include <stdlib.h>
#include <conio.h> /* getch */
#include <graph.h> /* graphics */
#include <i86.h> /* delay */

typedef unsigned char byte_t;

typedef enum {false,true} bool;

/* global structure to define the printer */

struct {
    unsigned long pxwidth;
    unsigned long pxheight;

    unsigned long xpos;
    unsigned long ypos;

    byte_t *ascii;

    bool is_underline;
    bool is_graphics;
    bool is_unix;
} Printer;

/* uses OpenWatcom C */

int pause(void)
{
    int key;

    /* draw a line to alert the user */

    _setcolor(7); /* white */
    _moveto(Printer.pxwidth-1, 0);
    _lineto(Printer.pxwidth-1, Printer.pxheight-1);

    /* read keystroke */

    key = getch();
    if (key == 0) {
        /* ext key .. read getch again for ext value */
        getch(); /* ignore ext value */
    }

    /* returning 0 for ext key is okay here */
    return key;
}

void new_page(void)
{
    /* clear the screen */

    _setbkcolor(0); /* black */
    _clearscreen(_GCLEARSCREEN);

    /* draw an empty page */

    _setcolor(15); /* br white */
    _rectangle(_GFILLINTERIOR, 0,0, Printer.pxwidth-1, Printer.pxheight-1);

    /* set the "print head" to "home" */

    Printer.xpos = 0;
    Printer.ypos = 0;
}

void new_line(void)
{
    /* new line is 8px in graphics mode, 10px in text mode */
    if (Printer.is_graphics == true) {
        Printer.ypos += 8;
    }
    else {
        Printer.ypos += 10;
    }

    /* add CR if Unix mode */
    if (Printer.is_unix == true) {
        Printer.xpos = 0;
    }

    /* if we reach the end of the page, start a new page */

    if (Printer.pxheight - Printer.ypos < 10) {
        pause();
        new_page();
    }
}

void print_byte(byte_t b)
{
    int off;

    /* print a vertical bit pattern at the current xpos. the "1"
        bit is on bottom .. the "128" bit is on top. */
    /* .. but we don't need to do this if printing "0" (empty) */

    if (b) {
        _setcolor(1); /* blue */

        for (off = 0; off < 8; off++) {
            if (b & (1<<off)) {
                /* ypos describes the "top" of the "print head" so we
                    need to do some math to print pixels correctly */
                _setpixel(Printer.xpos, Printer.ypos + (7-off));
            }
        }

        /* if you want to artificially slow down the program, do that
            here after printing something: */

        /* delay(1); /* milliseconds .. see i86.h */
    }

    /* only if text mode, add underline at 9th line */
    if ((Printer.is_graphics == false) && (Printer.is_underline == true)) {
        _setcolor(2); /* green */
        _setpixel(Printer.xpos, Printer.ypos+8);
    }

    /* advance the print head by 1px */
    /* if we reached the end of the line, wrap to the next line */

    if (++Printer.xpos > Printer.pxwidth) {
        new_line();
        Printer.xpos = 0;
    }
}

void print_char(int ch)
{
    /* print a character by referencing the 8x5 bit pattern
        from firmware. every char is defined by 5 columns
        of bit patterns. use print_byte to print it. */

    int i;

    /* element 0 in the Printer.ascii array is ascii 32, and
        the printable ascii elements are 32 .. 127 */

    if (ch < 32) {
        /* control codes */
        switch(ch) {
        case '\r': /* CR */
            Printer.xpos = 0;
            break;
        case '\n': /* NL */
            new_line();
            break;
        /* add others here */
        }
    }
    else { /* 32 or greater */
        if (ch > 127) {
            /* extended ascii .. these are 8x6 chars, no space */
            /* fake it .. print a 6-px box */

            for (i = 0; i < 6; i++) {
                print_byte(255); /* filled */
            }
        }
        else { /* 32 to 127 */
            /* printable ascii .. these are 8x5 + 1px space*/
            /* retrieve the bit-patterns from "firmware" */

            for (i = 0; i < 5; i++) {
                print_byte(Printer.ascii[((ch-32)*5)+i]);
            }

            /* add a space between letters */
            print_byte(0); /* space */
        }
    }
}

void print_file(FILE *in)
{
    int ch;

    while ((ch = fgetc(in)) != EOF) {
        print_char(ch);
    }
}

void test_printer(void)
{
    /* generate a printer test */

    int i;

    for (i = 32; i <= 127; i++) {
        print_char(i);
    }
}

int init_printer(void)
{
    int asc, line;

    /* define US Letter .. if 60 dpi, then:
        8 1/2 wide x 60 dpi = 510
        11 tall x 60 dpi = 660

        .. so US Letter is 510x660
    */

    Printer.pxwidth = 510;
    /* Printer.pxheight = 480; /* short page .. for 640x480 mode */
    Printer.pxheight = 660; /* for 1024x768 */

    /* set home position for first page */

    Printer.xpos = 0;
    Printer.ypos = 0;

    /* set printer defaults */

    Printer.is_underline = false;
    Printer.is_graphics = false;
    Printer.is_unix = false;

    /* allocate memory for firmware */
    /* low ascii is 32 to 127 .. that's (127-32)+1 = 96 chars
        .. and each is defined by 5 8-bit patterns */

    Printer.ascii = malloc(sizeof(byte_t) * 96 * 5);

    if (Printer.ascii == NULL) {
        /* fail */
        return 0;
    }

    /* load ascii chars into firmware .. if we had a char set
        defined, we'd load it here. since we don't, we'll fake
        it by loading bit patterns into each */

    for (asc = 32; asc <= 127; asc++) {
        for (line = 0; line < 5; line++) {
            if (asc == 32) {
                Printer.ascii[line] = 0; /* space */
            }
            else {
                Printer.ascii[((asc-32)*5)+line] = asc;
            }
        }
    }

    return (asc-32); /* number of ascii values entered */
}

void end_printer(void)
{
    /* free memory */
    free(Printer.ascii);
}

int main(int argc, char **argv)
{
    int i;
    FILE *in;

    /* init printer */

    if (init_printer() < 1) {
        puts("cannot load firmware");
        return 1;
    }

    /* set video */

    /* if (_setvideomode(_VRES16COLOR) == 0) { /* 640x480 */
    if (_setvideomode(_XRES256COLOR) == 0) { /* 1024x768 */
        puts("cannot set video mode");
        end_printer();
        return 2;
    }

    /* print files */

    new_page();

/*
    test_printer();
    pause();
*/

    for (i = 1; i < argc; i++) {
        in = fopen(argv[i], "rb");

        if (in) {
            print_file(in);
            fclose(in);
        }
    }

    /* done */

    pause();

    _setvideomode(_DEFAULTMODE);
    end_printer();

    return 0;
}
Virtual impact printing
This virtual printer program does a fair job of emulating a simple
impact printer. The simplification of a 5x9 character matrix means we
can show a single US Letter “page” using 510x660 pixels, which fits well
on a 1024x768 display. The characters are simple approximations of
letters, but that’s only because we lack a proper definition of the
letter forms in the “firmware.” For example, the text
This is a test looks like this in the virtual printer:

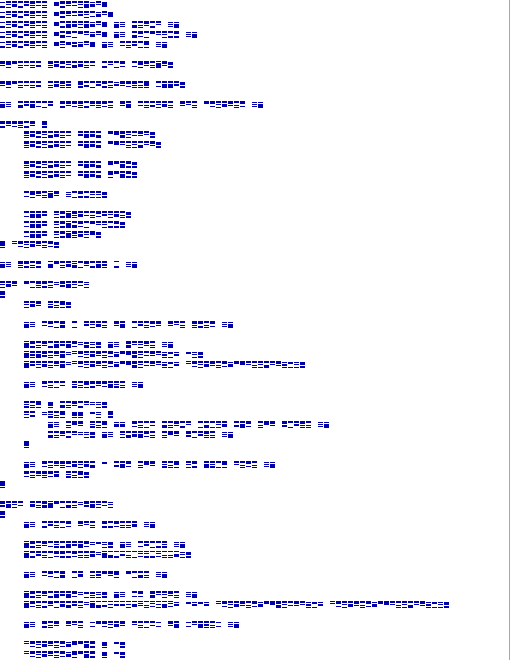
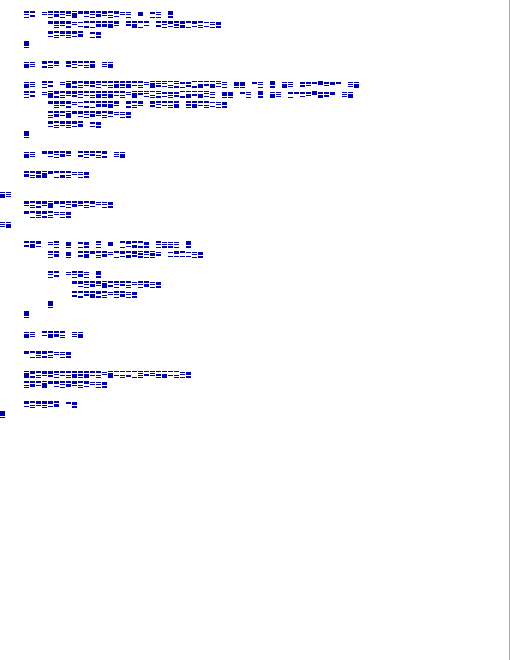
Each image generated by the virtual printer represents a new US
Letter page, which has 66 lines. The source code to this virtual printer
is just over 300 lines, which is just over four and a half pages. At the
end of each new page, the program uses a function called
pause which draws a gray line down the right side of the
page, then waits for the user to press any key. This “pause for input”
makes it possible to capture screenshots. For example, here is the first
and last page of output when printing the source code to the
program:
While this is a simple emulation of an idealized impact printer, you can use this as a model to understand how impact printers were able to print documents in the 1980s and into the 1990s.

Jim Hall is an open source software advocate and technical writer. At work, Jim is CEO of Hallmentum, an IT executive consulting company that provides hands-on IT Leadership training, workshops, and coaching.