 What is DITA?
Take a divide-and-conquer approach to reuse and remix content.
DITA (Darwin Information Typed Architecture) is an XML-as-markup document, and it’s a powerful way for technical writers to create content. If you work in an area that requires you to reuse other content to create new output documents, you should consider learning DITA.
The idea behind DITA is that you divide content into “topics” that you then remix and reuse in other documents. DITA defines several basic document types as “topics” that contain different kinds of content that you might use: DITA Concept to describe a thing, DITA Reference to provide just the facts about something, and DITA Task to list the steps in a process or procedure. You can also use Glossary entries for specific definitions, and Troubleshooting topics to provide guided help.
The first three topics get you pretty far down the road. Let’s look at how to create DITA Concept, DITA Task, and DITA Reference files:
DITA Concept
The DITA Concept file provides information about a thing. You might approach DITA Concept files as a kind of technical description topic, which provides details about a subject.
Since DITA uses XML as markup, this is just another XML document,
with all the rules of XML. The file starts with
<?xml version="1.0" encoding="UTF-8"?> and provides a
<!DOCTYPE> document type definition. The file
contains a single parent element called <concept>
that has three basic parts:
- A title
- A short description
- A body
Many of the DITA XML tags will look familiar to anyone who has
written HTML before, such as <p> for paragraphs,
<b> for bold, <i> for italic,
<u> for underline, <ul> for
unordered lists, <ol> for ordered lists,
<li> for list items, and <q> for
inline quotes. Other tags are similar but named differently, such as
<lq> (“long quote”) instead of a block quote, and
<codeblock> for block code samples.
DITA doesn’t support a “span” like HTML, but it has something
similar: <ph> marks a “phrase.” This element contains
inline text and doesn’t carry any specific formatting on its own,
similar to “span.” This “phrase” concept extends to other DITA XML tags,
like <codeph> for inline code.
Here is a sample DITA Concept file that demonstrates several common tags that you can use to format a topic:
<?xml version="1.0" encoding="UTF-8"?>
<!DOCTYPE concept PUBLIC "-//OASIS//DTD DITA Concept//EN" "concept.dtd">
<concept id="concept">
<title>DITA Concept</title>
<shortdesc>Information about a thing.</shortdesc>
<conbody>
<p>Think of a DITA Concept file as like a technical description or extended definition: this
is where you'll provide the information about a thing. Standard formatting includes
<b>bold</b>, <i>italic</i>, and <u>underline</u> text and <q>inline quotes</q> and
block quotes: </p>
<lq id="lorem_ipsum">Lorem ipsum dolor sit amet, consectetur adipiscing
elit.</lq>
<p>You can also use the typical block elements like unordered lists:</p>
<ul id="fruits">
<li>Apples</li>
<li>Oranges</li>
<li>Bananas</li>
</ul>
<p>and ordered lists:</p>
<ol id="numbers">
<li>One</li>
<li>Two</li>
<li>Three</li>
</ol>
<p>Other formatting helps you describe an API or interface like <apiname>curses.h</apiname>,
or an inline code sample like <codeph>main()</codeph>, or user input like
<userinput>y</userinput>, or a command name like <cmdname>gcc</cmdname>, or sample
output like <msgph>Hello world</msgph>. You can also use block formatting like sample
code:</p>
<codeblock id="count_c" outputclass="language-c">#include <stdio.h>
int main()
{
for (int i = 1; i <= 10; i++) {
printf("%d ", i);
}
putchar('\n');
return 0;
}</codeblock>
<p>and sample output:</p>
<msgblock id="count_out">$ ./count
1 2 3 4 5 6 7 8 9 10 </msgblock>
</conbody>
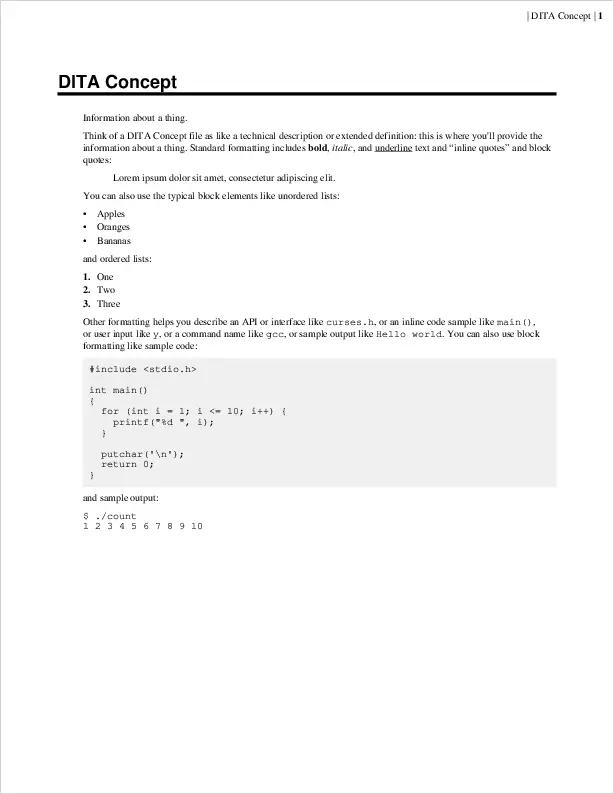
</concept>Typically, you would include this DITA Concept as a topic in a larger document, but you can also transform this one file into a PDF, to see what it looks like. Using the open source DITA Open Toolkit, developed under the Apache 2.0 license, you can perform an individual PDF transformation of this file, which becomes this:
$ dita -i concept.dita -f pdfThis generates a very plain PDF document. You can apply styles to the transformation to give it your own look, but this is the default:
DITA Reference
Reference files provide only factual information about something. One common way to present just the facts is with a list or table. Otherwise, the same kinds of formatting that you can apply to a DITA Concept apply to DITA Reference files.
Like other DITA topics, the DITA Reference contains three basic elements:
- A title
- A short description
- A body
Note that DITA XML tables contain more structure than HTML. In an
HTML document, tables are <table> with an optional
caption, a <thead> for the table header,
<tbody> for the table body, and
<tfoot> for the table footer Table rows are defined
with <tr>, which contains <th> for
table header data (usually in the table header section) and
<td> for the table data.
DITA XML tags to define tables are similar, although the tags are
named slightly differently, such as <row> to define a
row and <entry> to define an entry in the table. As
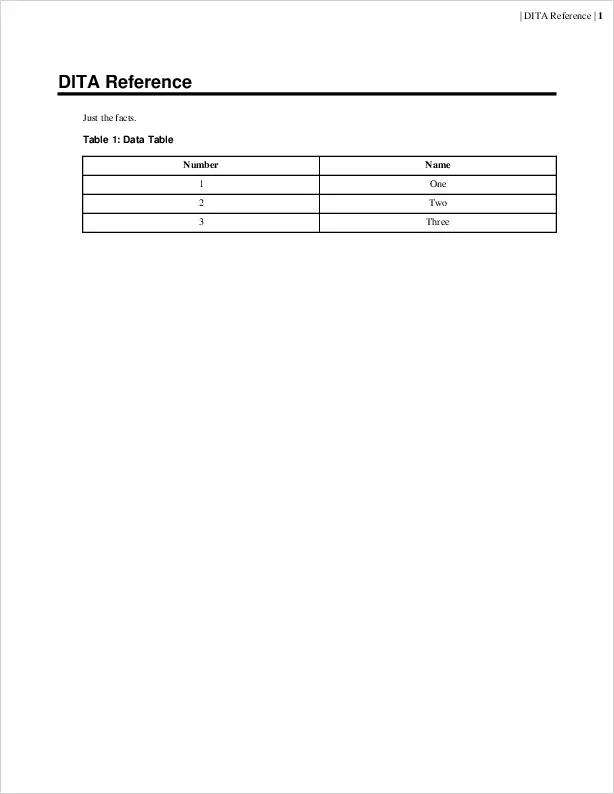
an example, here’s a sample DITA Reference file with a data table to
show what that looks like:
<?xml version="1.0" encoding="UTF-8"?>
<!DOCTYPE reference PUBLIC "-//OASIS//DTD DITA Reference//EN" "reference.dtd">
<reference id="reference">
    <title>DITA Reference</title>
    <shortdesc>Just the facts.</shortdesc>
    <refbody>
        <table frame="all" rowsep="1" colsep="1" id="number_tbl">
            <title>Data Table</title>
            <tgroup cols="2" align="center">
                <colspec colnum="1" colname="c1"/>
                <colspec colnum="2" colname="c2"/>
                <thead>
                    <row>
                        <entry>Number</entry>
                        <entry>Name</entry>
                    </row>
                </thead>
                <tbody>
                    <row>
                        <entry>1</entry>
                        <entry>One</entry>
                    </row>
                    <row>
                        <entry>2</entry>
                        <entry>Two</entry>
                    </row>
                    <row>
                        <entry>3</entry>
                        <entry>Three</entry>
                    </row>
                </tbody>
            </tgroup>
        </table>
    </refbody>
</reference>
Like other DITA topic files, you would usually include this DITA Reference within a larger document. But just to see what it looks like here is a PDF transformation of the file:
DITA Task
Task files provide the steps to follow a process or to perform a procedure. Like other DITA topic files, the DITA Task has three basic sections:
- A title
- A short description
- A body
Within the body, you should provide one or more paragraphs to “set the stage” for the tasks. For example, you might write why someone might perform this task or follow these instructions.
Steps in the procedure are defined in a <steps>
parent block element, with each step defined as a separate
<step> block element. The similar naming can be
confusing, but a handy memory aid is that you’re defining each
step in a series of steps for a process. Inside each
step, provide the instruction in a <cmd> block.
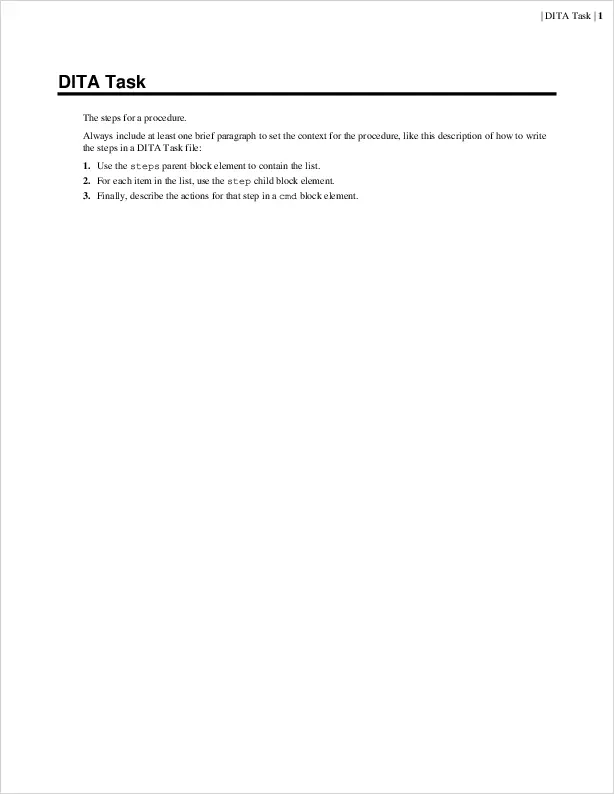
Use this sample DITA Task file to demonstrate the basics of writing a
Task file. DITA Task files can use standard DITA XML tags for
formatting. In this example, I’ve also used <codeph>
for inline code statements:
<?xml version="1.0" encoding="UTF-8"?>
<!DOCTYPE task PUBLIC "-//OASIS//DTD DITA Task//EN" "task.dtd">
<task id="task">
    <title>DITA Task</title>
    <shortdesc>The steps for a procedure.</shortdesc>
    <taskbody>
        <context>
            <p>Always include at least one brief paragraph to set the context for the procedure,
                like this description of how to write the steps in a DITA Task file:</p>
        </context>
        <steps>
            <step>
                <cmd>Use the <codeph>steps</codeph> parent block element to contain the list.</cmd>
            </step>
            <step>
                <cmd>For each item in the list, use the <codeph>step</codeph> child block
                    element.</cmd>
            </step>
            <step>
                <cmd>Finally, describe the actions for that step in a <codeph>cmd</codeph> block
                    element.</cmd>
            </step>
        </steps>
    </taskbody>
</task>
Again, DITA topics are usually meant to be included in a larger document, so you would not usually transform a DITA Task into a PDF on its own. But let’s look at a PDF tranformation anyway, just to see the result:

Jim Hall is an open source software advocate and technical writer. At work, Jim is CEO of Hallmentum, an IT executive consulting company that provides hands-on IT Leadership training, workshops, and coaching.