 How I formatted a book with groff
I loved this project to reformat a document as a professionally printed book.
In 2000, my wife earned her Master's (MA) degree. This was the culmination of two years of hard work, and I was (and am) very proud of what she achieved. The last step in earning a graduate degree is writing a thesis; hers was entirely written in Microsoft Word, and included several images and equations. I'm sure more recent versions of Word have improved, but Word 2000 (released June 1999) was not very stable. She tapped away for endless nights on the Windows laptop we had at the time, coaxing Word not to eat her formatting, which it did with alarming frequency, especially when inserting a new graphic. But in the end, she completed her thesis at over 80 pages, with 17 figures, a page of equations, and four pages showing a timeline of key milestones of her topic from 1887 to 2000.
Unfortunately, that was also the year that her university stopped printing student theses; they were submitted and distributed only in PDF format. My wife never received a printed version of her thesis like MA students in previous years. When I later earned my Master's (MS) degree, the practice of printing a thesis (or in my case, a capstone) as a book was no longer the norm, so at least I never expected to receive a printed book. But I always regretted that my wife missed out on a printed and bound thesis.
This year, for my wife's birthday, I wanted to surprise her by printing her thesis. These days, self-publishing a book is quite easy, and publishing websites like Lulu.com specialize in printing one-off books like this. However, I didn't want to just print the PDF that she generated in 2000. My wife struggled to get Word to format her document the way she wanted, and while the final product looks great, you can spot a few formatting errors if you look closely. For example, a few paragraphs have odd line breaks around the images, probably as a result of trying to get the images to appear correctly on the page.
I wanted to clean up the formatting before I memorialized it in a
printed book. I love working with document markup, so I decided that the
best way to approach this was to dump the text from the PDF, then apply
markup to reformat the document as a book. This sounds hard, but it
turned out to be pretty easy. I used groff
with the
ms macros to prepare a PDF. Here's how I did it:
Document parameters control major formatting
The ms formatting macros provide number registers and
strings that allow authors to control the appearance of their document.
These are set to reasonable defaults, such as T (Times) for
the font family and 12p for the font size, but you can
change these to your preferences with the .nr (number
register) and .ds (define string) macros at the top of your
document.
I wanted to make my wife's book look great in print, so I made several changes to make the document look exactly how I wanted. Here are all of the settings I made:
.nr PS 12p
.nr VS 18p
.nr HY 0
.ds FAM P
.nr PI 4n
.nr PD .2i
.nr QI 1i
.nr PORPHANS 2
This does several things. For example, neither my wife nor I have
much love for the Times
font, so I changed the font to P (Palatino) at 12-point
size. Here's a full list of what those changes mean:
| Macro | What it does | New value |
|---|---|---|
.nr PS 12p |
Point size | 12 point |
.nr VS 18p |
Vertical spacing between lines | 18 point (effectively, 1.5 spacing) |
.nr HY 0 |
Hyphenation | Turned off |
.ds FAM P |
Font family | Palatino |
.nr PI 4n |
Paragraph first-line indent | 4 en |
.nr PD .2i |
Paragraph distance (space between paragraphs) | 0.2 inch |
.nr QI 1i |
Block quote indentation | 1 inch |
.nr PORPHANS 2 |
Paragraph orphans | 2 lines |
Read the man groff_ms manual page for a list of all the
strings and registers that you can use to control the formatting of your
documents.
Quoted paragraphs
As an academic paper, this thesis has a lot of quoted paragraphs. We usually refer to these as block quote in other markup systems like HTML, where you provide a long quote from another source.
The ms macros provide several types of paragraphs,
including .LP for left paragraphs (no first-line indent)
and .PP for body paragraphs (with first-line indent). For
quoted paragraphs, use the .QP macro. This indents the
paragraph by QI on the left and right sides, which helps
the block quote to stand out from the rest of the text.
.PP
This is a normal first-line indent paragraph.
Lorem ipsum dolor sit amet, consectetur adipiscing elit, sed do
eiusmod tempor incididunt ut labore et dolore magna aliqua.
.QP
This is a quoted paragraph. Note that it is indented from the rest
of the text.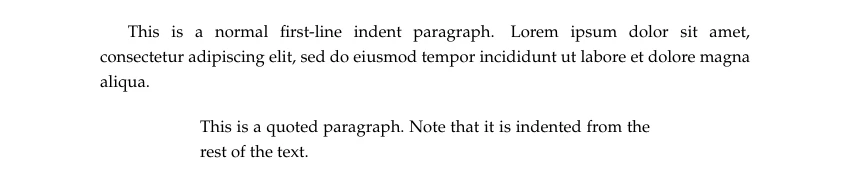
The .QP macro generates a block paragraph, without a
first-line indent. For multiple quoted paragraphs, my wife added these
quotes with a block paragraph as the first paragraph and first-line
indent for following paragraphs. To achieve this, I created a
multi-paragraph block quote using .QS and .QE,
and formatted regular paragraphs inside that. This basically creates a
container for the full block quote.
.PP
Use QS and QE if you need to provide more than one paragraph in a
block quote.
This acts like a block quote container for other text.
.QS
.LP
I'll start the block quote with a block paragraph.
Duis aute irure dolor in reprehenderit in voluptate velit esse
cillum dolore eu fugiat nulla pariatur.
.PP
Following paragraphs in the block quote use a regular paragraph,
with a first-line indent.
.QE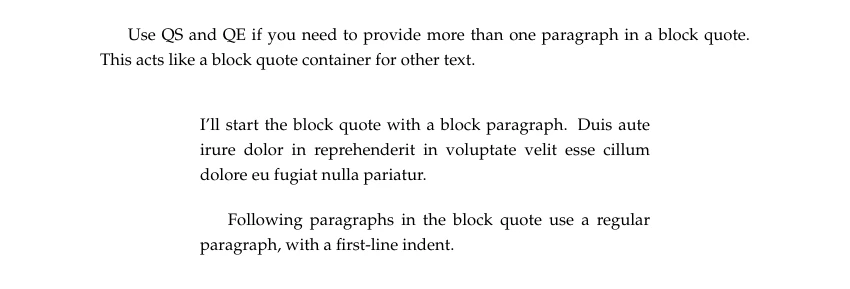
Read the man groff_ms manual page for a list of all
formatting that you can do with the ms macros, including
paragraphs and headings.
Images and placeholders
The thesis has 17 images in it. I didn't want to get distracted with
the images while I was setting up the major formatting of headings and
paragraphs, so as an interim measure I added placeholders as figures.
The pic system is the standard way to add diagrams to a
document. This system has a learning curve if you want to create
technical drawings or detailed figures, but I only wanted to create an
empty frame as a placeholder. This is very simple to do.
To insert a pic diagram in a groff
document, use .PS to start and .PE to end. The
pic preprocessor will look for these markers and interpret
any instructions between them.
One basic shape is the box, which is all I needed to
represent a diagram that I could insert later. The box
shape can take dimensions of width and height,
and text (inside quotes) to use as the label. For each placeholder
image, I made a rough guess about how big the image might be, by looking
at the original PDF.
.PP
Here's a placeholder for an image:
.PS
box width 4 height 3 "Add image here";
.PE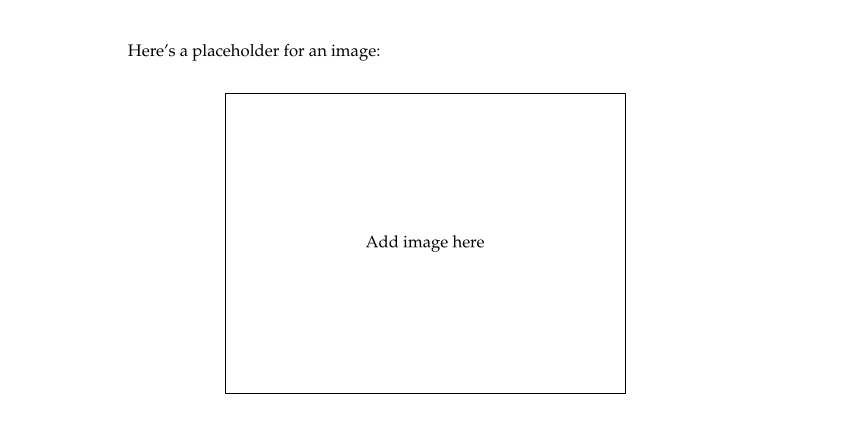
After I finished formatting the rest of the document, I went back and
inserted the images using the .PDFPIC macro. This actually
required a few steps: I had to use pdfimages to extract the
images from the original PDF document, which saved them as PPM images,
then use ImageMagick to convert the PPM images to PDF format so
.PDFPIC could use them.
The .PDFPIC macro accepts several options, but I only
used -C to center the image horizontally on the page, plus
a parameter to set the width (groff can figure out the
height on its own). Inserting an image using the .PDFPIC
macro can be dangerous if you did not create the PDF image so
groff will reject your images unless you use the
-U (unsafe) option.
.PDFPIC -C "images/pdf/014.pdf" 6iTo learn more about creating diagrams with pic, read the
man pic manual page. Also look in
/usr/share/doc/groff for a document named
pic.ms or pic.ps; this is a copy of "Making
Pictures with GNU PIC" by Eric Raymond.
Typesetter quotes and other symbols
The groff system will helpfully translate certain common
characters into nice-looking symbols. For example, a straight single
quote (like you'd type on your keyboard) will become a right-hand
"curled" quote. However, this is a one-to-one translation of the
character; there is no "intelligence" to detect if the single quote
at the start of a word should be a left-hand "curled" quote.
For a similar reason, straight double quotes remain plain quotes.
The ms package provides a string that you can expand
with \* to insert left and right "curled" quotes. These are
called typesetter quotes; using \*Q adds a left-hand quote,
and \*U adds a right-hand quote. I like to think of these
as "quote" and "unquote."
You can insert these and other special symbols using special
characters or escape sequences that start with the back slash.
To insert an en dash, which is useful for a number range, use
\[en]. For an em dash—like this one—use
\[em]. Another way to insert left and right quotes is
\[lq] and \[rq] to mean left quote
and right quote. Insert quotes within quotes (as single quotes)
with \[oq] and \[cq] as open quote
and close quote.
Special characters like accented characters also use similar escape
sequences. For example, the accented é can be written
with \['e], the dieresis ü is written as
\[:u], and the tilde ñ uses
\[~n]. However, the ms macros also support
adding accents and other marks with its own special strings. I used this
to add an to any character using \*', such as
\*'a for an accented á.
.LP
Here are some common accented characters or other special marks:
.br
\[AE] \[ae] \[,c] \[`a] \['e] \['i] \[^o] \[:u] \[co] \[rg] \[+-]
Read the man groff_char manual page to see the full list
of supported characters.
Create a table of contents
For a short document of a few pages, you don't need a table of contents; you can just flip through the pages to find what you need. Documents much longer than that, like over 20 pages, will benefit from a table of contents. If the document is much longer than that, like the thesis at over 80 pages, a table of contents is absolutely necessary to help the reader locate content.
The ms macros can generate a table of contents for you
automatically. Whenever you start a new section heading, either with
.NH for numbered headings or .SH for
unnumbered headings, also make a copy of the heading inside
.XS and .XE. This adds the extra text to a
kind of database in groff that also records the page number
where it occurred. Insert the .TC macro at the end of the
document to print a table of contents from this database; the table of
contents restarts the page number at i.
.TL
Sample document
.SH
Introduction
.XS
Introduction
.XE
.PP
This is an example of how to automatically create a table of contents
using the
.B ms
macros. The \*Qsecret\*U is to enclose the contents entry inside
.CW .XS
and
.CW .XE
instructions. At the end of the document, add the
.CW .TC
request, which will generate a table of contents page automatically.
.TC

The thesis also included a table of figures. Unfortunately, I don't know of a way to automatically generate a table of figures, similar to the table of contents. But there weren't very many images in the document, so it wasn't a very big task to create a separate file that generated a 1-page table of figures document with the page number ii.
.P1
.ds CH "-ii-
.ds TOC "Table of Figures
.XS 29
Figure 1. Deriving the Cantor Set
.XE
.XS 31
Figure 2. The Mandelbrot Set
.XE
.XS 32
Figure 3. Zooming in on the area between the two largest bulbs
.XE
.XS 33
Figure 4. Edge detail from the first zoom
.XE
.XS 34
Figure 5. Zooming in on a spiral
.XE
.XS 35
Figure 6. Detail of a spiral arm
.XE
.XS 36
Figure 7. Further detail from the previous image
.XE
.XS 37
Figure 8. Image at the crossroads
.XE
.XS 38
Figure 9. The Mandelbrot Set redux
.XE
.XS 39
Figure 10. The Sierpinski Triangle
.XE
.XS 39
Figure 11. Detail of the Sierpinski Triangle
.XE
.XS 40
Figure 12. Creating the Koch Curve
.XE
.XS 41
Figure 13. The Koch Snowflake
.XE
.XS 43
Figure 14. The Julia Inverse Set
.XE
.XS 44
Figure 15. Triskilon at Bryn Celi Ddu, Wales
.XE
.XS 48
Figure 16. Frontispiece of a Bible Moralisee
.XE
.XS 49
Figure 17. The Koch Island
.XE
.PX
A script to put things in order
Creating the table of contents this way was typical when documents were prepared for a typesetter, then manually assembled for production. The table of contents page gets generated at the end, so you simply move this last page to the front of the document. That's not a problem when generating output for a phototypesetter or a laser printer, but it's an issue if you want to create a PDF that you can transmit to a print shop so they can print a book for you.
I automated this step by writing a short Bash script. This
mkfinal.bash script did all of the steps for me: starting
with the original 85-page PDF document, it used pdfseparate
to split out the first three pages as front matter, then saved
the last page as a separate table of contents file, and
separated the rest of the interior as the body text. I also had
a separate table of figures PDF file that I wanted to insert
after the table of contents.
This would bring the document to 86 pages. To generate a PDF file
that's ready for printing as a book, you need to ensure your file is a
multiple of four pages. I needed to add two extra blank pages: one
between the front matter and the table of contents,
and another at the very end of the document. Using pdfunite
with all of the content in the right order gave me an 88-page document
that I could transmit to the printer.
#!/bin/bash

file=thesis.pdf
output=thesisfinal.pdf

pages=$( pdfinfo $file | awk '/^Pages:/ {print $2}' )

[ -d tmp ] || mkdir -v tmp

pdfseparate -f 1 -l 3 $file 'tmp/front-%d.pdf'
pdfseparate -f 4 -l $((pages - 1)) $file 'tmp/body-%d.pdf'
pdfseparate -f $pages -l $pages $file 'tmp/toc-%d.pdf'

echo | pdfroff -ms > tmp/blank.pdf

pdfunite tmp/front*pdf tmp/blank.pdf tmp/toc*pdf figs.pdf tmp/body-?.pdf tmp/body-??.pdf tmp/blank.pdf $output

rm -rf tmp
I could have hard-coded the page count; I knew the finished document
was 85 pages. But entering "85" would require that I update the script
if I later applied other formatting to the document that happened to add
another page to the output. Instead, I used pdfinfo to get
information about the original PDF document, such as the page count, and
saved that in the pages variable in the script. That neat
trick also allowed me to use arithmetic expansion with
$(( )) to specify the correct page range to extract the
body pages.
This project to prepare my wife's Master's thesis and print it as a
book was a labor of love. It was a wonderful surprise to show my wife
what I had made for her, so she could finally have a professionally
printed and bound copy of her thesis. Formatting it with
groff also allowed me to fix several formatting issues, and
upgrade other formatting at the same time. This included small details
like "curly" quotes for all quote marks, and larger issues such as
consistent paragraph spacing throughout the entire document.
This was also an experiment in using groff to generate a
larger document, and gave me practice in using the ms
macros in a nontrivial way. I enjoyed this document preparation project.
And I think it demonstrates how you can create your own professionally
printed documents. Yes, groff may be old, but it's not out
of date. Try formatting your own documents with groff to
see what you can do with it.

Jim Hall is an open source software advocate and technical writer. At work, Jim is CEO of Hallmentum, an IT executive consulting company that provides hands-on IT Leadership training, workshops, and coaching.